Think about what you actually do when you move a file in Finder.
You open a window. You find the file. Then you open a second window, navigate that one to the destination, and now you have two windows that overlap — so you drag them apart until you can see both at once. Then, finally, you drag the file across. And when you're done, you close one of them, because two overlapping windows are no way to live.
You've probably done this so many times that it doesn't feel like a workaround any more. It is one, though. Every single time, you rebuild the same temporary arrangement by hand: here and there, side by side.
A dual-pane file manager starts from the other end. Two folders are always on screen. One is where you are, the other is where things go. You never arrange anything, because the arrangement is the app.
FileWorks is built that way, and once the model clicks, a surprising amount of daily friction just disappears. Let's walk through it.
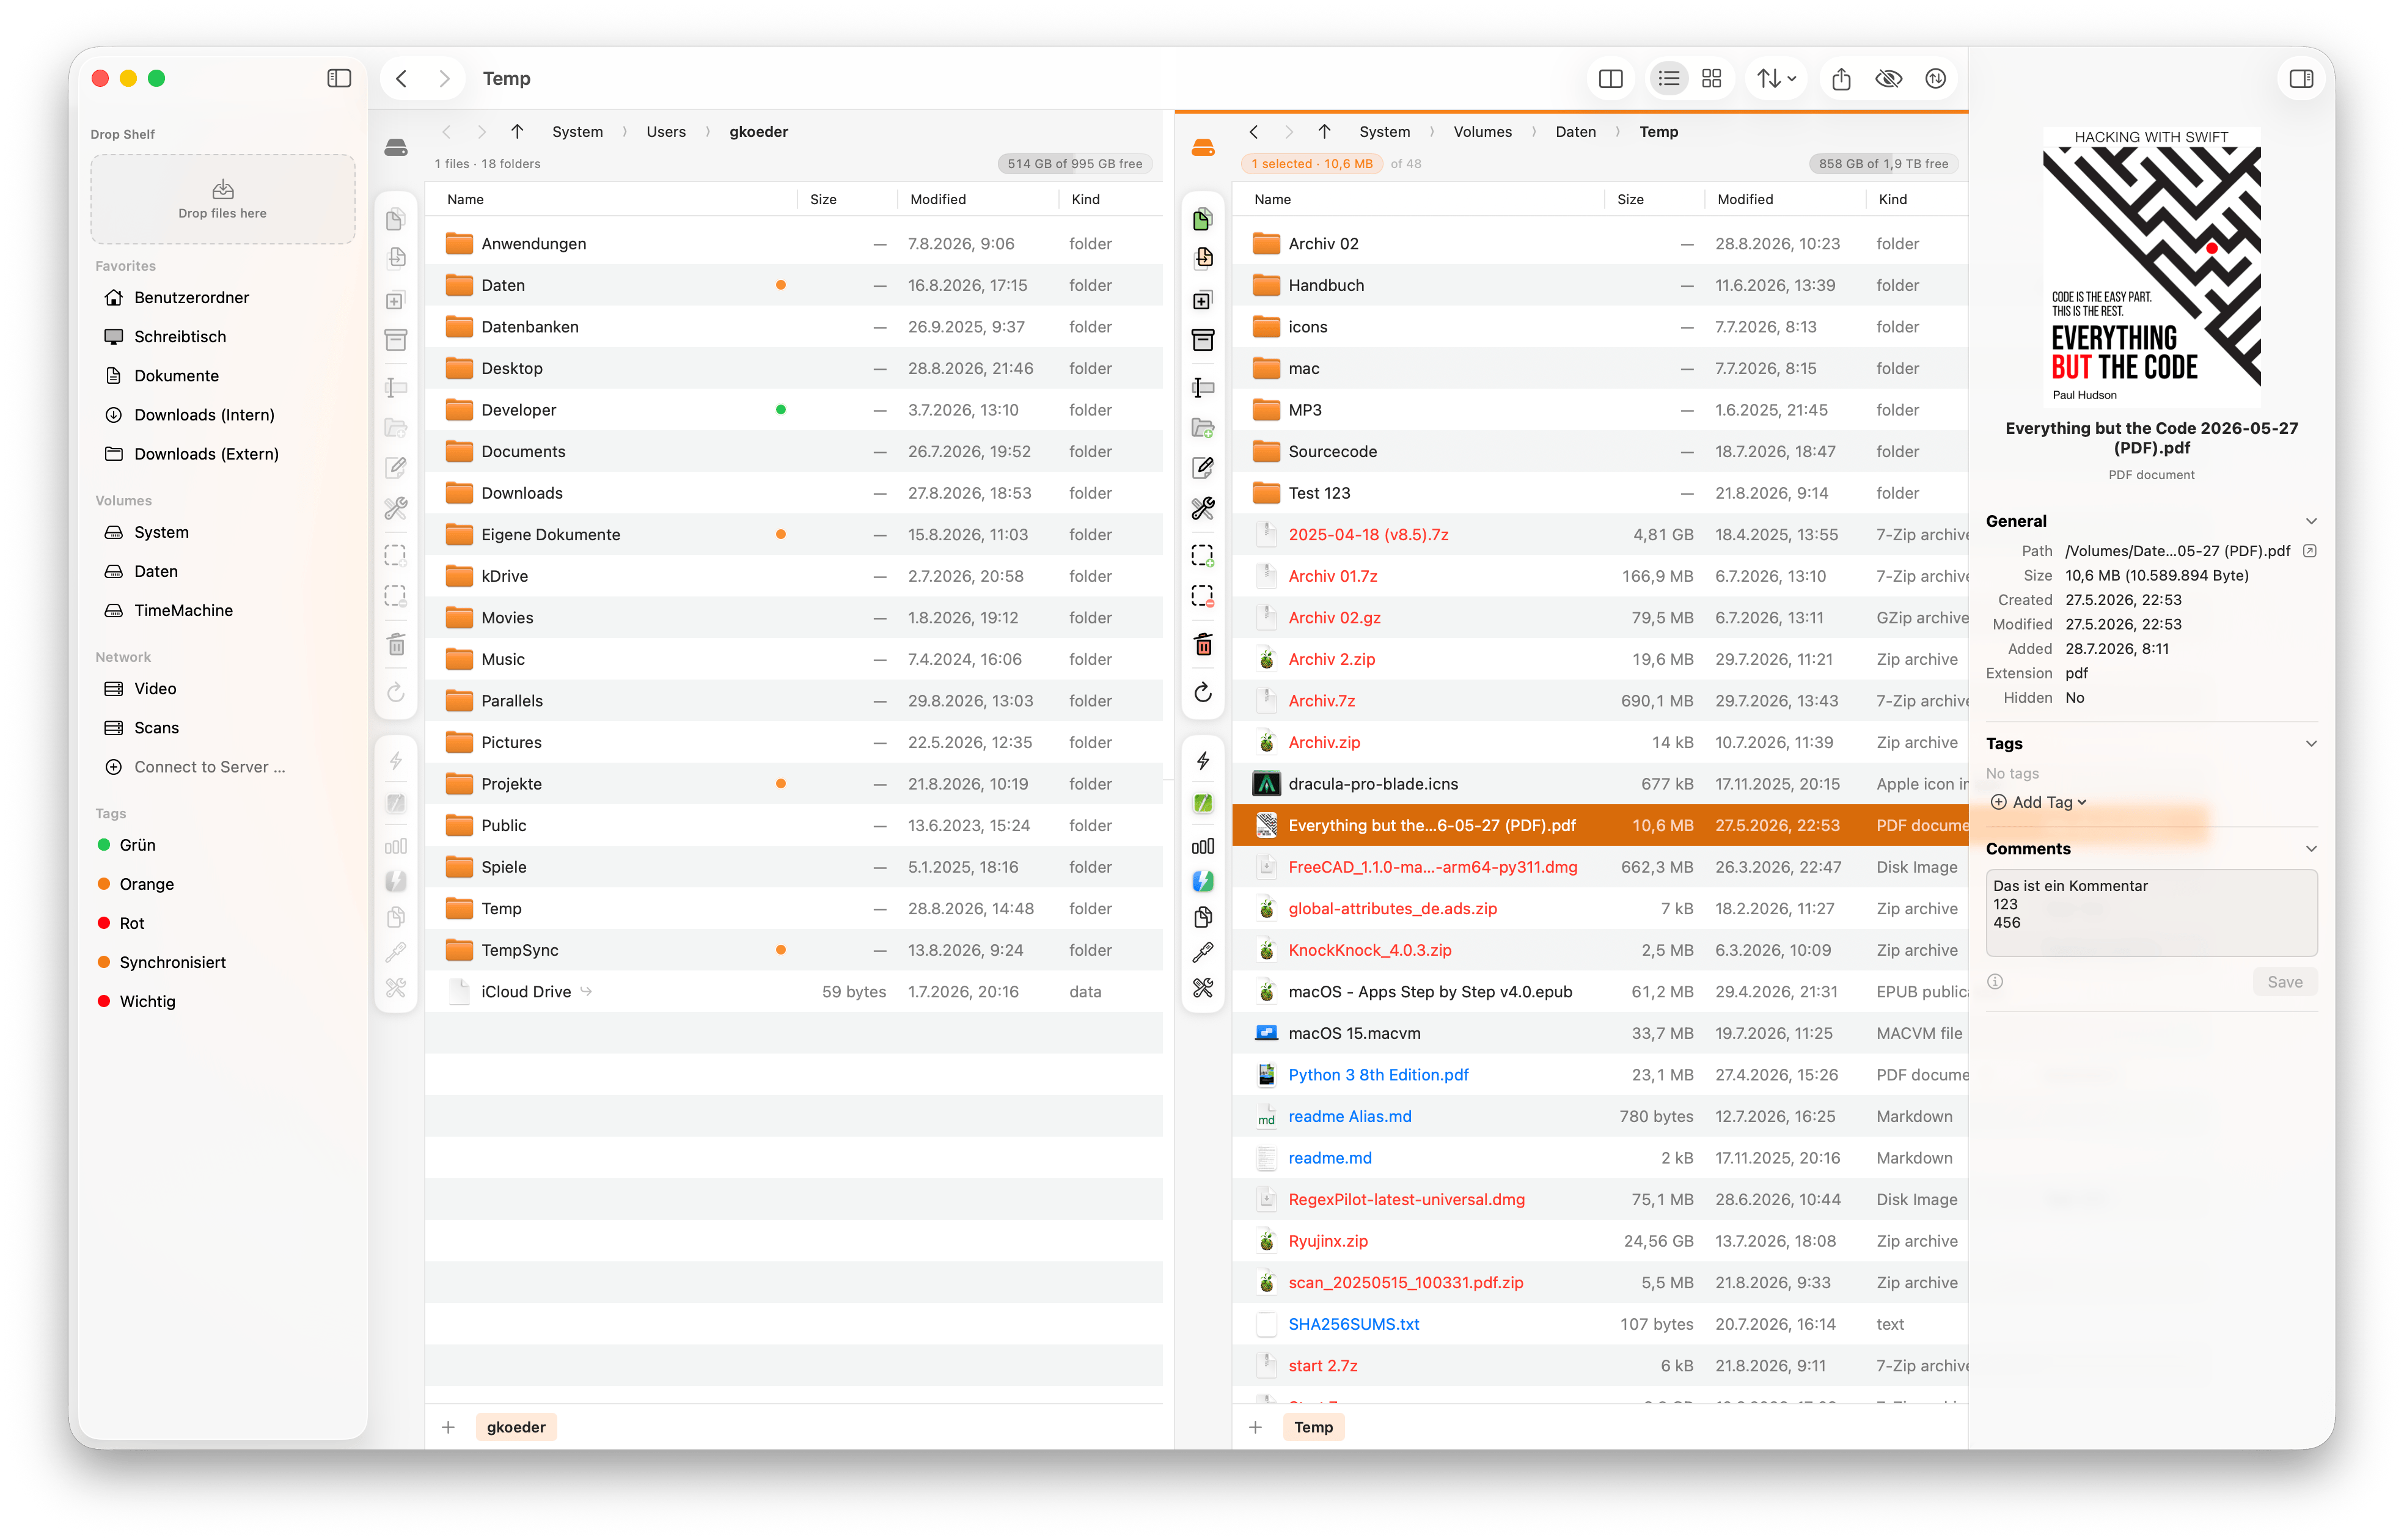
Source and destination
The whole idea fits in one sentence: one panel is the source, the other is the destination.
Mark some files on the left, press F5, and they're copied to the right. F6 moves them instead. That's it — no dragging, no second window, no aiming.
What makes this work isn't the keyboard shortcut, it's that "the other panel" is a direction rather than a place you have to set up first. You're not saying "copy these to /Volumes/Backup/2024/Invoices". You're saying "copy these over there" — and over there is already visible, already correct, because you navigated it once and it stayed.
That's the shift. Finder makes you specify a destination for every operation. A commander makes you aim the destination once and then work.
The active panel
Since commands need to know which side is "here", one panel is always the active one — the one you last clicked in. A coloured bar along its top edge shows which.
Almost everything acts on the active panel. The other one is simply "the other panel", the target for copying and moving. In the inactive panel the whole action toolbar greys out, so there's never any doubt about where a click would land.
Tab switches sides. That one key is worth committing to memory before anything else, because it turns the two panels into something you steer rather than something you point at.
What's in a panel
Each panel is self-contained, top to bottom:
- A header with the drive icon (that's the jump list — more on it shortly) and the path bar.
- A status bar telling you how many items the folder holds, how much is selected, and how much room is left on the drive.
- The action toolbar down the side: copy, move, duplicate, pack, rename, new folder, and so on. Your own tools sit in a second card below the built-in ones — a deliberate split between what FileWorks can do and what you built yourself.
- The file list itself, as a list or an icon grid.
- A tab bar along the bottom.
Between the two panels sits a divider. Drag it and one panel grows while the other shrinks; it snaps at the centre, and a double-click puts it back exactly.
Getting around
Navigation is deliberately ordinary — double-click a folder to enter it, or press →in the list. ⌘ + ↑ goes up a level. ⌘ + ← and ⌘ + → step back and forward through folders you've visited. ⌘ + ⇧ + H takes you home.
One small thing there is worth pointing out, because you'll feel it every day without necessarily noticing it: when you go up a level, the folder you just came out of is sitting under the cursor again. So you can keep going with the arrow keys instead of hunting for your place in a long list. It's a two-line detail that saves a thousand small moments.
The path bar, and hopping sideways
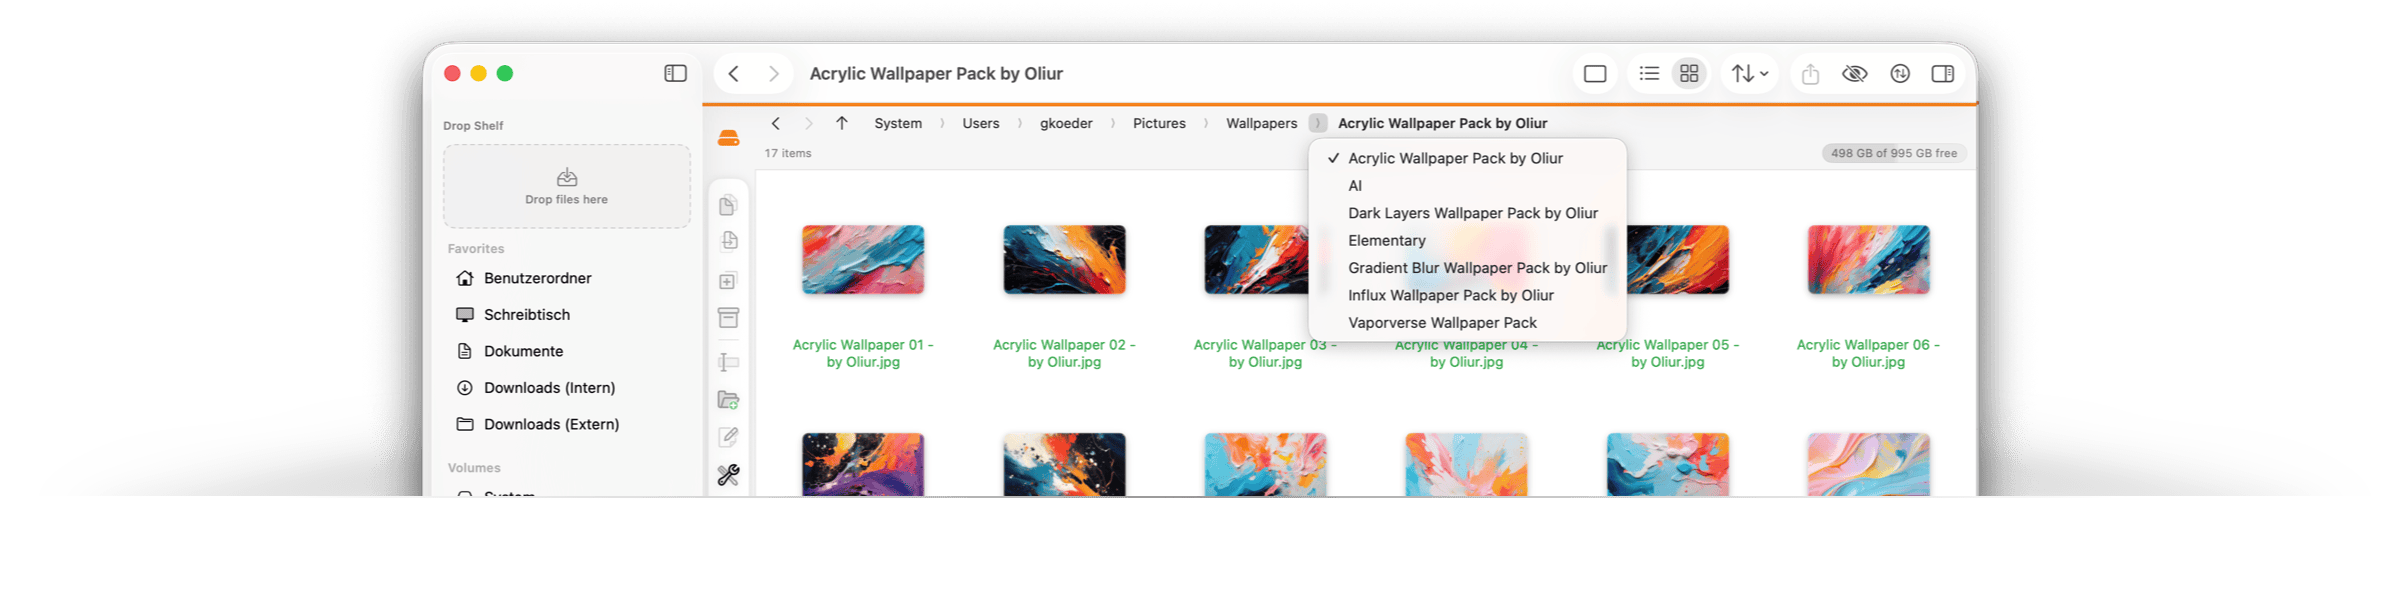
The path bar shows where you are as a row of clickable folders. Click any one to jump straight there. If the path is longer than the panel, the bar slides so the current folder stays visible.
Look between two folders and you'll see a small chevron. Click it and you get a menu of the neighbouring folders at that level — so you can hop straight into the folder next door without going up and back down. Once you know it's there, it replaces a lot of up-and-down.
Typing a path
⌘ + ⇧ + G lets you type a path directly. It understands absolute paths, ~ for home, and paths relative to where you are. As you type it suggests matching subfolders — ↑ / ↓ to pick one, ⇥ to complete, ↩ to go.
The jump list: where two panels really pay off
This is the part I'd most like you to try, because it's where the two-panel model stops being a layout and starts being a way of working.
The drive icon at the top left of a panel opens the jump list — or press ⌘ + 1 for the left panel and ⌘ + 2 for the right. It holds your favourites, with every attached drive below them, and a tick beside wherever you are now.
The fastest way to use it is not to reach for the mouse at all: just start typing. Each character narrows the list, and the first match is already selected. So:
⌘ + 1 ·
dow· ↩ — and the left panel is in your Downloads folder.
Capitalisation and accents don't matter: grosse finds a folder called Größe, and doc is enough for Documents.
Drives show a slim bar for how full they are, with the free space beside it — orange when things get tight, red when a drive is nearly full. You can see whether something will fit before you jump there, let alone before you start copying.
The Option key turns it around
Here's the clever bit.
At the top of the list, under Other panel, sits the folder the opposite panel is showing. Click it and both panels show the same directory — handy when you're about to spread files from here across several subfolders. It only appears when it would actually do something.
Now hold ⌥ while the list is open. The entire list retargets the other panel.Every row gains an arrow pointing across, and whatever you click — or open with ↩ — lands over there instead of here.
And the top section flips with it. Instead of showing the other side's folder, it now shows your own: "send it across" instead of "fetch it here". Two directions, same place, no second shortcut to learn. Let go of ⌥ and everything is as it was.
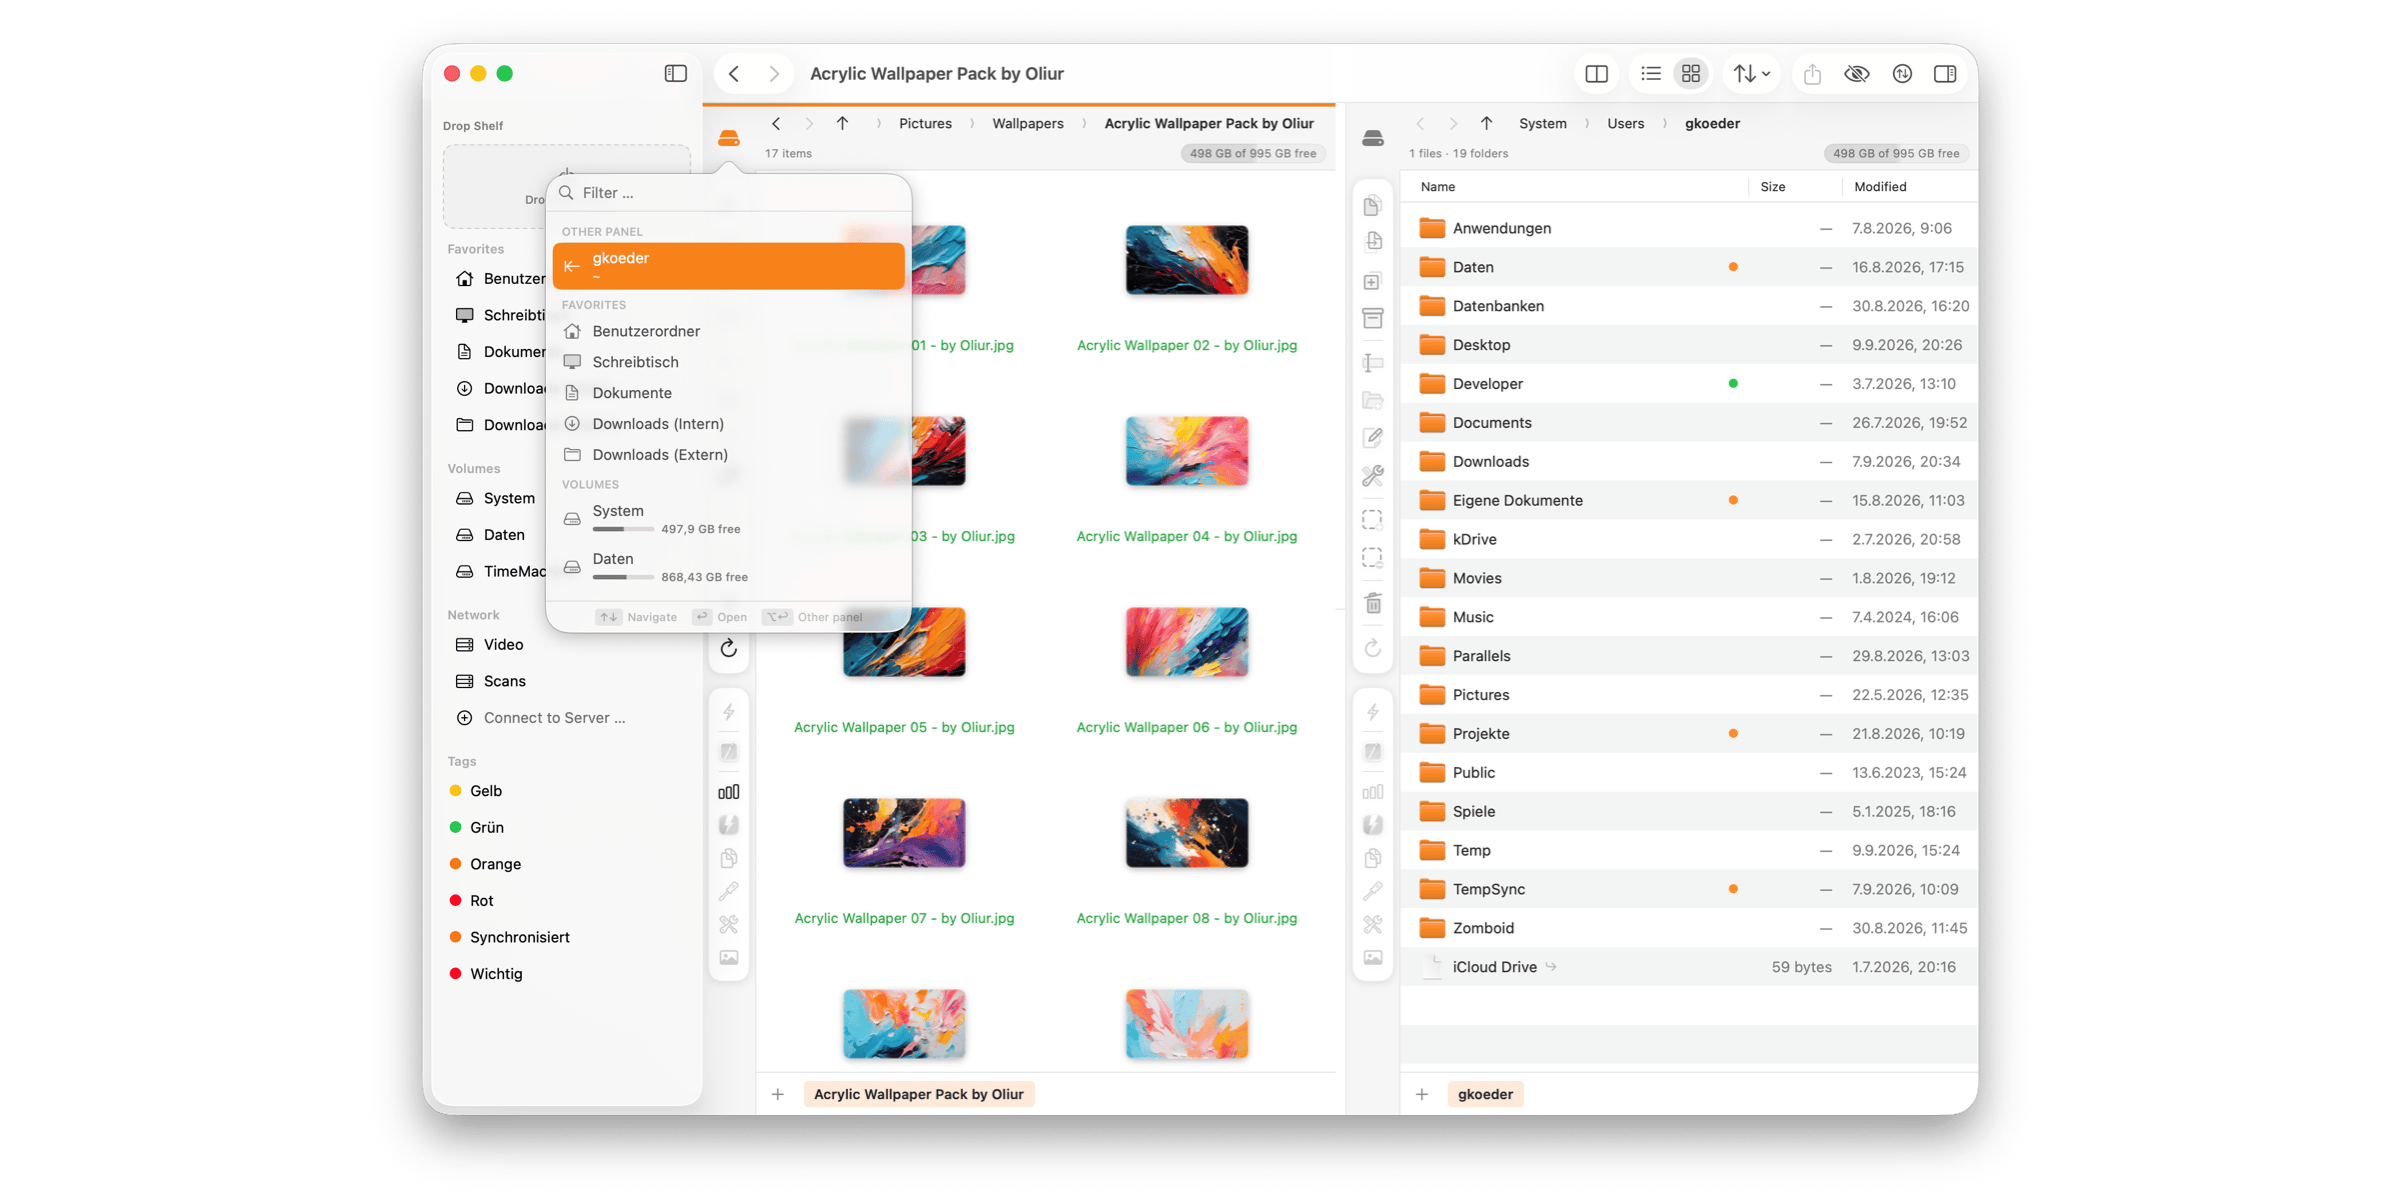
The practical version of all this is one keystroke sequence worth stealing:
You're on the left with your files. ⌘ + 1, type a few letters, ⌥ + ↩ — and the backup drive is now open on the right, ready to receive. Your hands never left the keyboard, and you never left your files.
That's the two-panel model in miniature: aim the destination, then work.
Tabs, per panel
Each panel has its own row of tabs along the bottom. ⌘ + T opens one, ⌘ + W closes it, and ⌃ + ⇥ steps through them — the same keys as Safari or Terminal.
Because the tabs belong to the panel rather than the window, you can keep a project folder and its build output open on the left while the right side wanders around your drives. By default your tabs come back next time you launch; you can turn that off if you prefer a clean start.
When one panel is enough
Not every task wants two folders, and FileWorks doesn't insist. ⌥ + ⌘ + 2 hides the right panel and you have a tidy single-pane file manager.
Hidden, not closed. Bring it back and its tabs, history and selection are exactly as you left them.
Commands that would normally address the other panel simply ask instead. F5 and F6 become Copy to Folder … and Move to Folder …, and the dialog opens at the destination you chose last time — so a run of transfers to the same place costs one click each. Nothing goes missing; the queue still docks at the bottom as usual.
The jump list is even nicer here than in two-panel mode. Without ⌥ there's no "other panel" section, because there's no other panel. Hold ⌥ and it appears anyway — and clicking it brings the second panel out and drops it straight into that folder. Single-pane mode with an escape hatch, on one key.
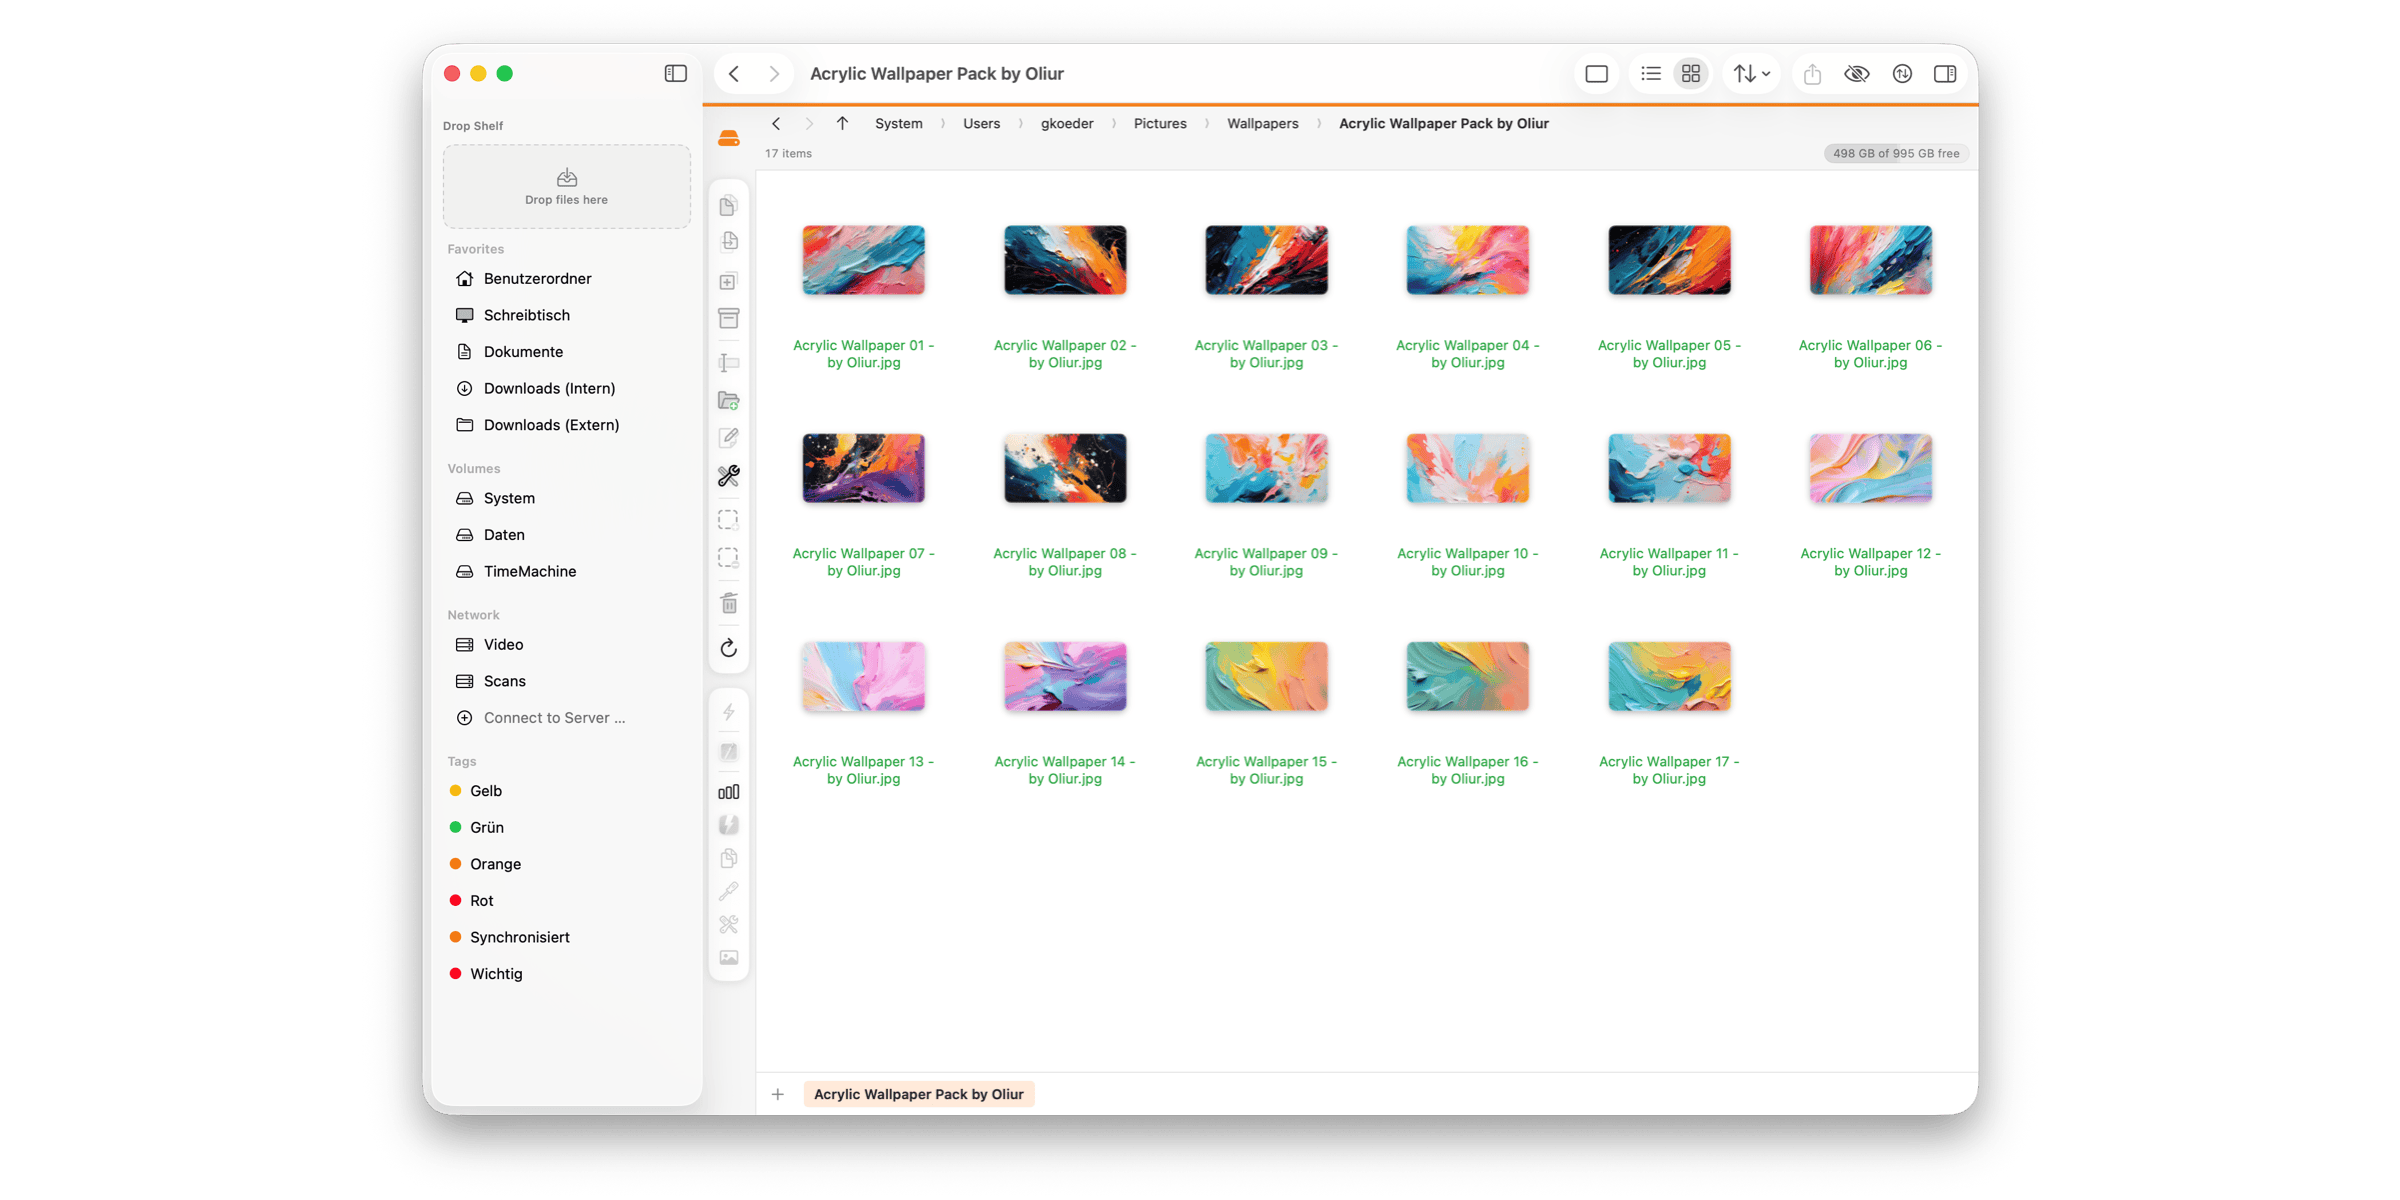
Collecting things as you go
One more piece worth knowing early, because it solves a problem two panels alone don't: what if the files you want aren't all in one folder?
At the top of the sidebar sits the Drop Shelf — a small holding area. Drag files onto it, or select them and press ⌘ + ⇧ + D. Wander through as many folders as you like, adding as you go, then navigate to the destination and drag the whole collection out at once — into a panel or into Finder.
If the same collection has to go to several places in turn, switch on Keep items after dragging out in the shelf's menu and it survives each drag.
It's the natural partner to single-pane mode, and honestly it's useful in two-panel mode too.
Three habits worth forming
Compare two folders by sorting them the same way. Open both side by side, same sort order, and the differences simply stand out. No special comparison mode required — it falls out of the layout for free.
Use Replace All Older for incremental backups. Copy a folder over an older copy and choose Replace All Older in the conflict dialog. FileWorks refreshes only what's newer and merges the rest.
Keep one hand on the keyboard. Tab switches panels, F5 and F6 transfer, Space previews. That's a complete workflow without touching the mouse, and it's genuinely faster once it's in your fingers.
The short version
- Two folders, always visible. One is the source, the other the destination.
- The active panel is where you are; Tab switches sides.
- F5 copies to the other panel, F6 moves.
- The jump list (⌘ + 1 / ⌘ + 2) is type-to-filter; hold ⌥ and it aims at the other panel instead.
- Tabs belong to panels, so each side keeps its own set.
- ⌥ + ⌘ + 2 hides the second panel — hidden, not closed, and nothing stops working.
- The Drop Shelf collects files across folders when they aren't conveniently in one place.
If you're coming from Finder, give it a week of resisting the urge to drag things between windows. The moment it clicks is usually the first time you catch yourself pressing F5 without having thought about where the file was going — because you'd already aimed, ten minutes earlier, and it was still pointing the right way.