Ask anyone what a file manager does and they'll say: copy, move, delete. True — but that's the easy half. The part that actually eats your time is the step before: gathering exactly the right files. The forty photos out of six hundred. Every .tmp file except the one you still need. The invoices from March, but not the drafts.
FileWorks takes that step seriously. It gives you a handful of tools that stack neatly on top of one another, and once you know how they fit together, assembling a batch stops feeling like work. Let's walk through them.
Two layers: selection and marks
This is the one concept worth understanding first, because everything else builds on it.
The selection is the macOS highlight you already know — the row under the cursor. Arrow keys move it, a click sets it. Commands that concern a single item use it: Rename, Quick Look, the inspector, opening a folder.
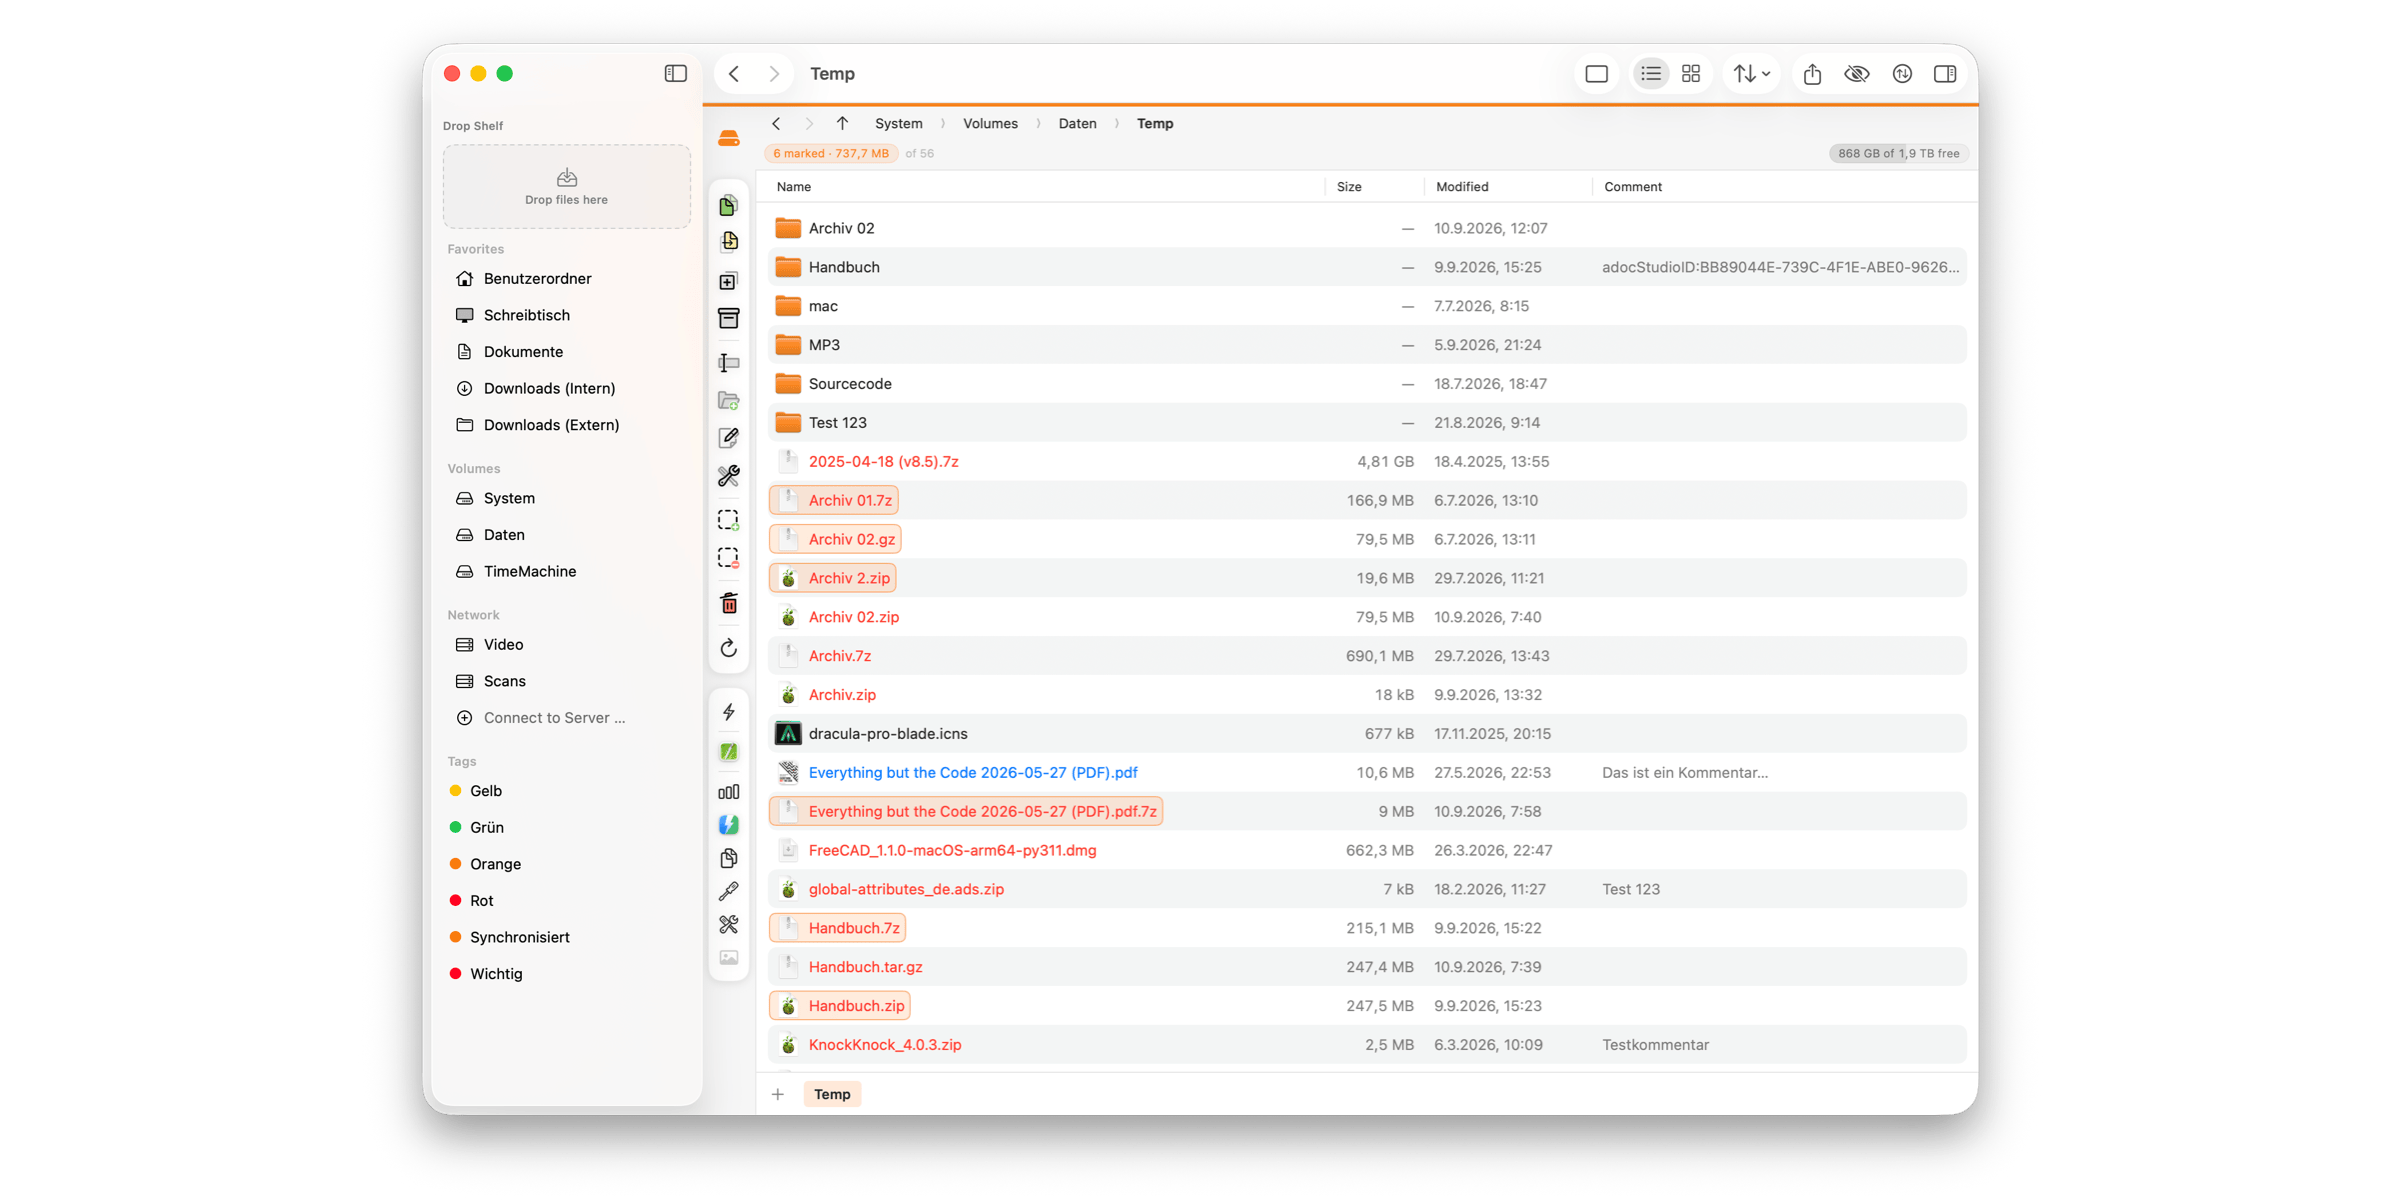
Marks are a second layer sitting on top — the classic commander trick. A marked item wears a coloured pill around its icon and name (in the icon grid, around the whole tile). And here's the key difference:
Marks stay put. Move the cursor, click somewhere else, filter the list — your marks survive all of it. They hold until you clear them or leave the folder.
That's what makes them so useful. Almost every file command acts on the marks when there are any, and falls back to the selection when there aren't: Copy, Move, Duplicate, Delete, Edit, Pack, Multi-Rename, Create Link, Add to Drop Shelf — and any tools you've built yourself.
So you can assemble a batch at your own pace, across several passes, and one stray click won't undo twenty seconds of careful work. The status bar keeps score: "N of M marked".
 And if you never mark anything? Then FileWorks simply behaves like Finder, and the selection is your working set. The marks are there when you want them and invisible when you don't.
Marking, by mouse and by keyboard
With the mouse, hold ⌥ and click — on the name in the list, anywhere on the tile in the grid. That toggles the mark without disturbing the selection. The context menu has Markand Unmark too.
With the keyboard, the workhorse is ⇧ + Space. It marks the item under the cursor and moves down one row. Tap it repeatedly and you mark a whole run in one motion. Plain Space stays Quick Look, exactly as in Finder.
There's a nice trick hiding here. Just built a range with ⇧ + ↓? Press ⇧ + Space and the entire range becomes marks — and the cursor is free again to go build the next block somewhere else. Range, convert, range, convert. It's a surprisingly fast way to pick scattered groups.
esc clears the marks first, and the selection on a second press.
Tip: If either Space command clashes with something else you use, you can change the modifier under Settings → General → Selection & Quick Look. The Space key itself stays; only the modifier moves.
Just start typing
Before we get to the pattern tools, a small one that's easy to miss: in the file list, just start typing a name and the cursor jumps straight to it. Capitals don't matter, and neither do accents — typing mul lands on Müller.pdf.
The clever bit is what happens when you press the same letter again. It doesn't extend what you typed — it jumps to the next match. That matters more than it sounds, because with folders sorted first, the first m almost always lands on a folder. Tapping m again walks you down through the rest, wrapping around at the end of the list.
New letters narrow, the same letter cycles. Stop typing for a second and the buffer resets.
Search, Filter, Mark — three stages, one place
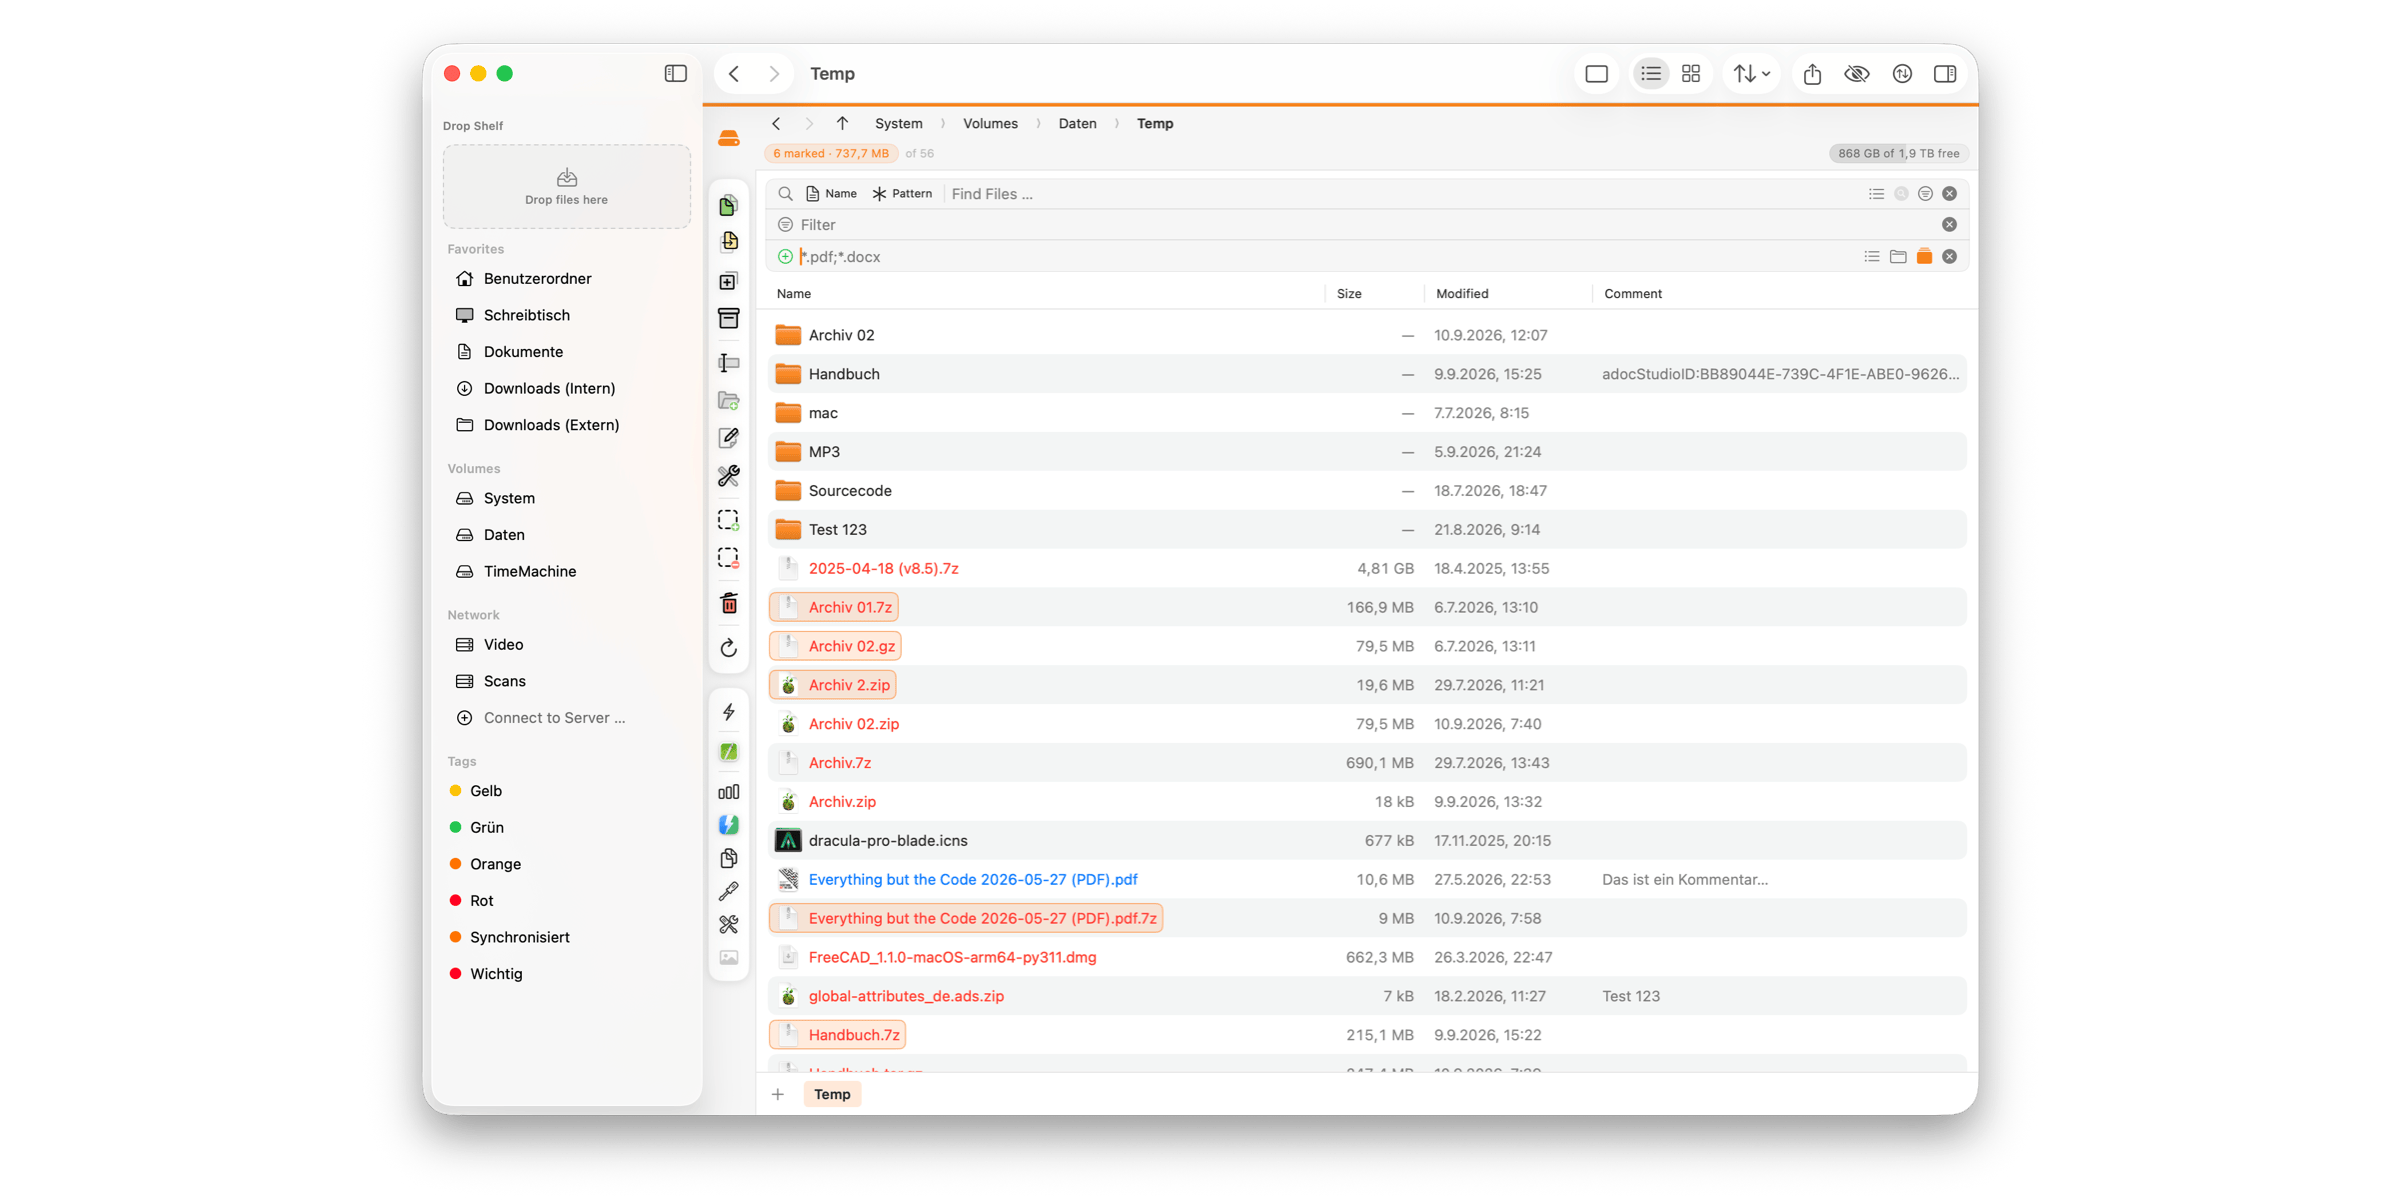
FileWorks has three pattern tools, and they all appear in the same spot: a block above the file list. Each one works on its own, and each has its own ✕ and its own shortcut.
- Search (⌘ + ⇧ + F) — produces the list, recursively from the current folder.
- Filter (⌘ + F) — narrows what's displayed.
- Mark (⌘ + S) — marks within what's displayed.
When several are open they always keep that order, top to bottom — regardless of which you opened first. That's not cosmetic: they form a chain. Each stage works on the result of the one above it.
Which means you can genuinely use all three in sequence: search recursively, filter the results down, mark by pattern what's left, then press F5 to copy the lot. Three tools, one flow, no intermediate steps.
The Quick Filter (⌘ + F)
The filter is the gentlest of the three. Type, and everything whose name doesn't contain your text simply disappears from view. It updates as you type, shows the match count, and applies per tab — so a filter in one tab doesn't disturb another.
Two details make it pleasant to live with:
It doesn't care about case or accents. muller finds Müller. PDF finds .pdf.
Your marks survive it. Hidden isn't the same as gone. You can mark a few files, filter to something completely different, mark a few more, clear the filter — and both sets are still there. Only items that genuinely left the folder are dropped.
That second point is what makes the filter a gathering tool rather than just a viewing tool. Filter to invoice, mark what you want, filter to receipt, mark some more, clear the filter, press F5. Everything you touched comes along.
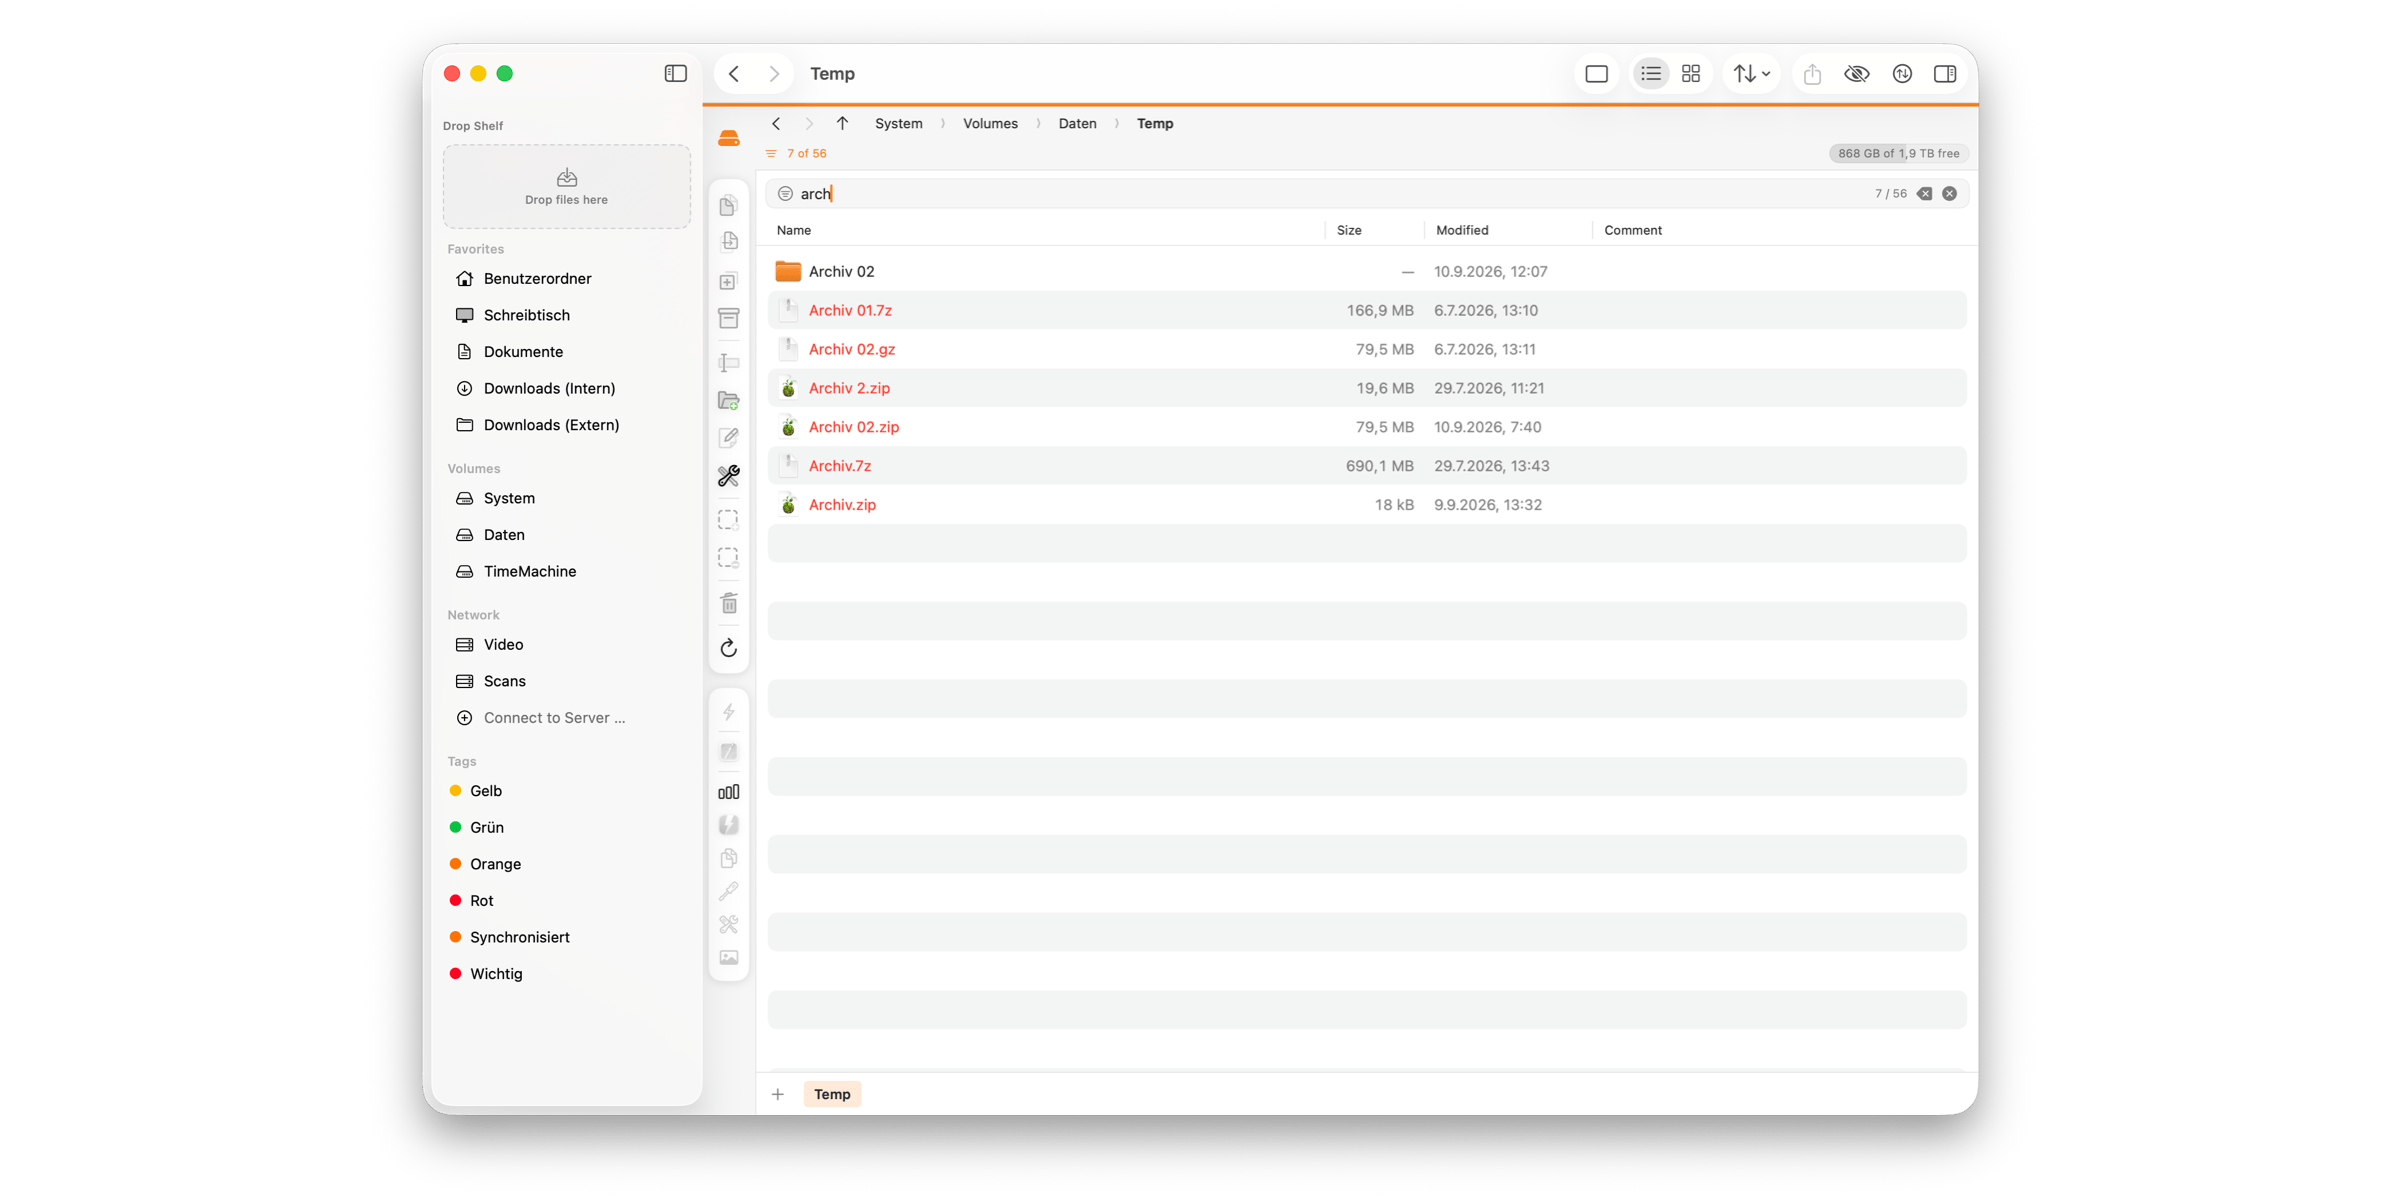 The filter matches a plain substring — no wildcards. For patterns, you want the next tool.
Select by Mask (⌘ + S)
This is the precision instrument. Type a pattern, press ↩, and everything matching gets marked. The field closes again afterwards — it's a one-off action, not a permanent state.
*.pdfmarks all PDFs.IMG_????.jpgmarks names likeIMG_0421.jpg.- Several patterns at once, separated by spaces, semicolons or vertical bars:
*.jpg;*.png. - Text without wildcards is treated as part of a name.
As you type, the field shows how many items would match if you pressed ↩. Watch that number — it's exactly the set that F5, F6 and F8 will then act on. A red 0 means no matches.
Plus and minus
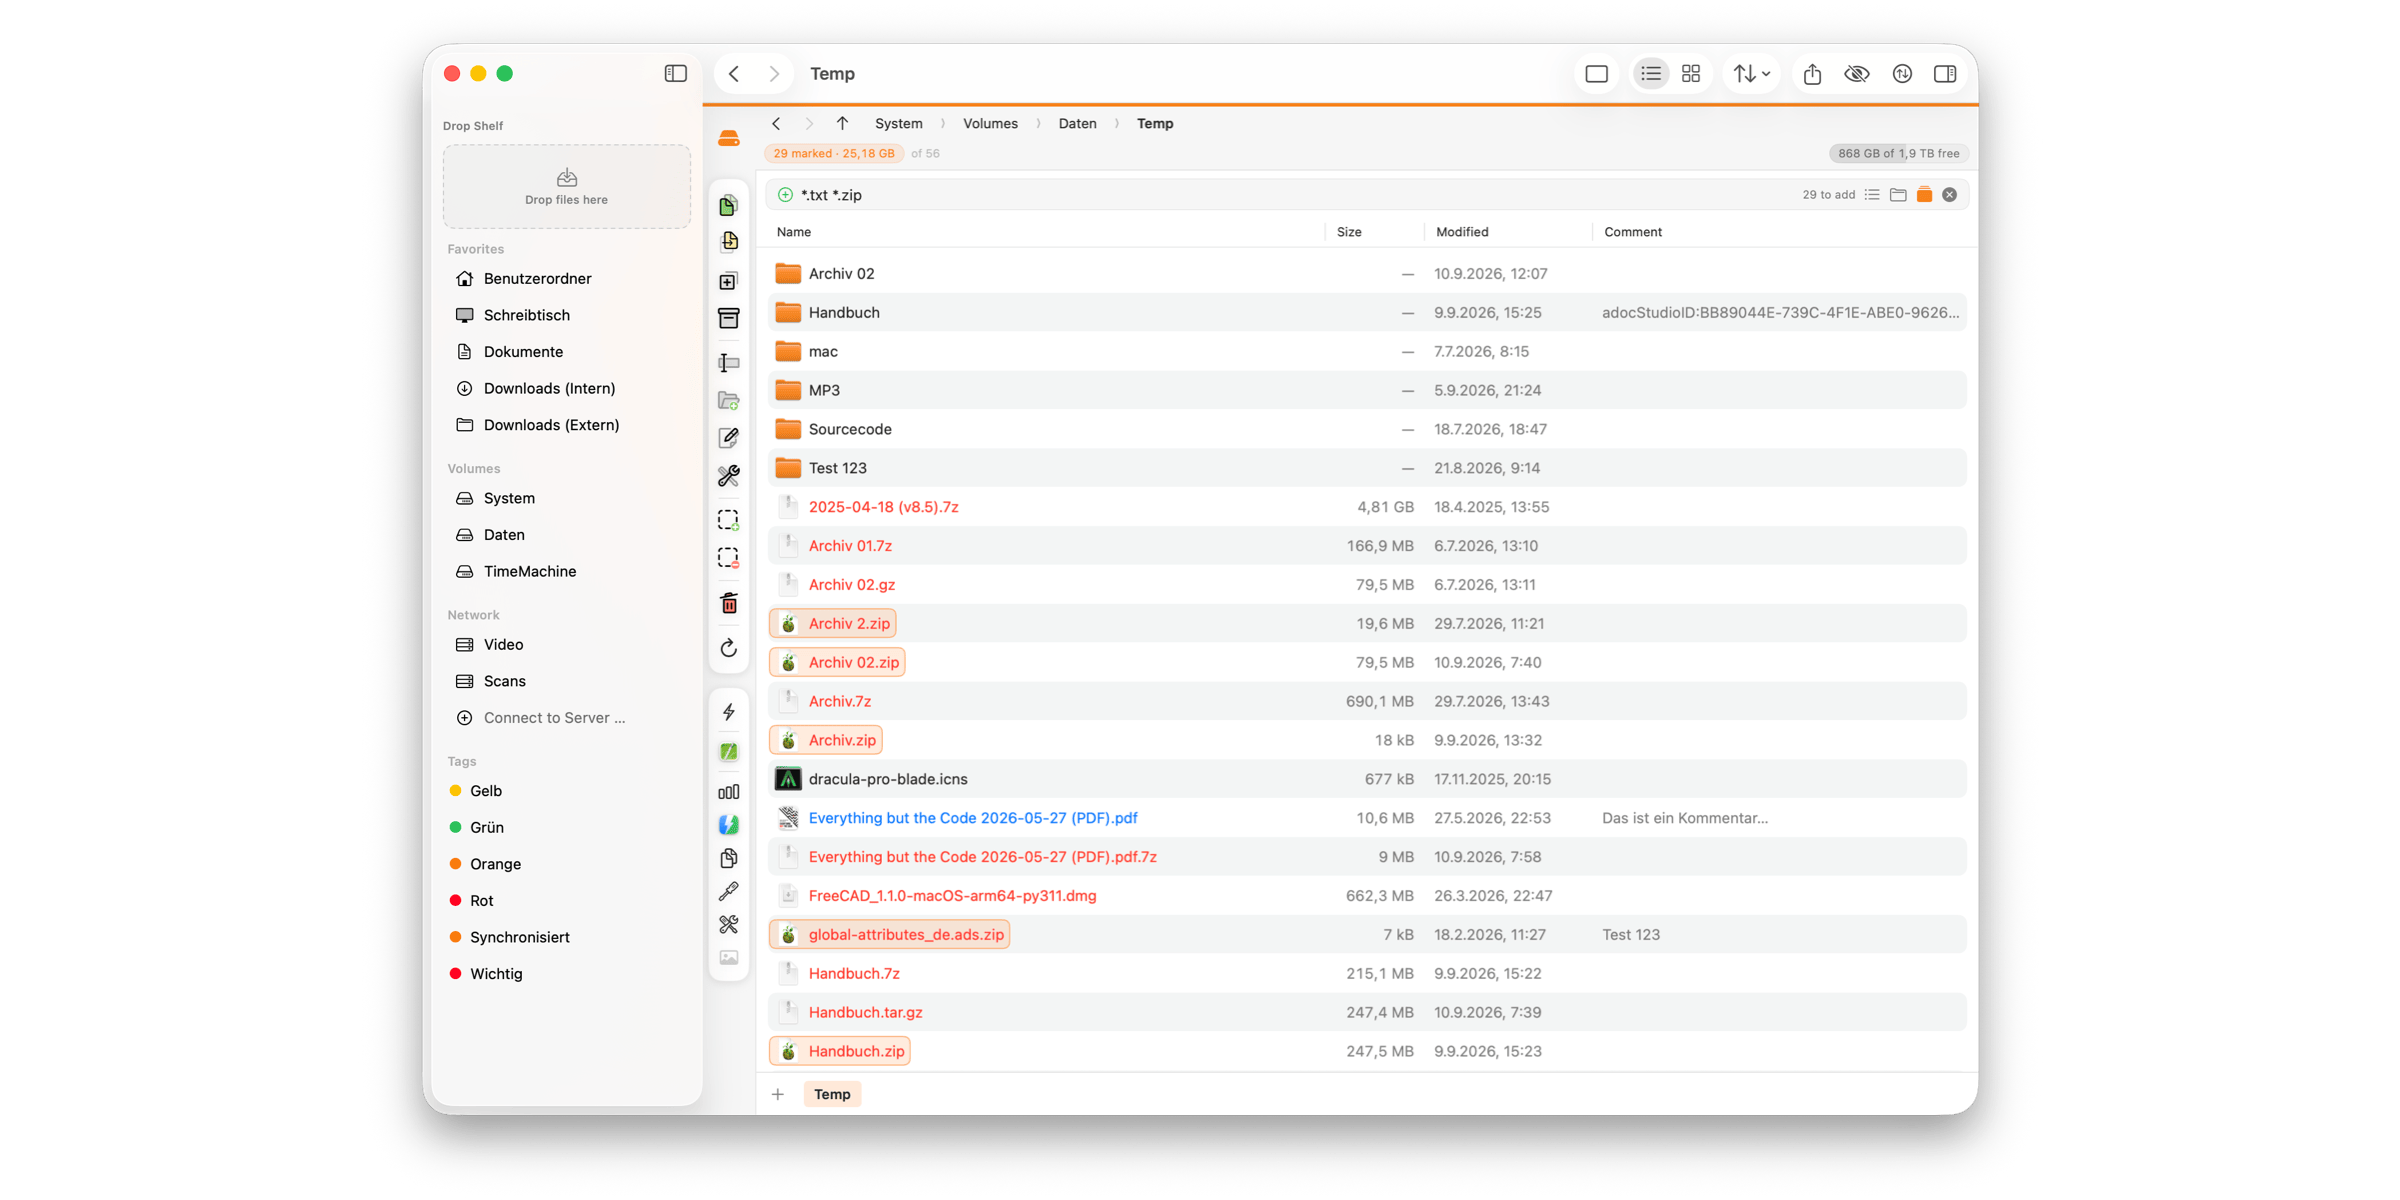
At the far left of the mask row sits a + or a −, and it tells you what ↩ is about to do. Click the sign to switch.
A green + sets marks on the matches, replacing whatever was marked before. A red −removes marks from the matches.
There's one lovely twist. If nothing is marked yet, unmarking turns itself inside out: FileWorks marks everything except the matches. So unmarking *.tmp on a fresh folder means "mark everything but the temp files" — one step, no setup. ⌘ + ⇧ + S opens the row directly in minus mode. (Coming from Total Commander? +and − on the numeric keypad work as well.)
One safety rule worth knowing
If a pattern matches nothing, you end up with nothing marked — the previous marks are dropped. That's deliberate. If you ask FileWorks to "mark the text files" and there are none, you don't want the old marks quietly sitting there when you press F8. The counter warns you in advance, which is exactly why it's there.
(This applies to setting marks. Collecting and unmarking leave existing marks alone.)
Collecting across passes
Normally the row closes after ↩. The Collect button — the stacked rectangles — keeps it open instead:
- The row stays put and the field clears, ready for the next pattern.
- ↩ now adds to the marks instead of replacing them.
- In − mode, ↩ still removes.
So the set grows piece by piece: *.pdf ↩, *.docx ↩, then flip to − and draft* ↩ to take the drafts back out. Each pass tells you how many items it would add or remove before you commit.
FileWorks remembers the setting; it also lives under Settings → General → Select by Mask.
One more thing: the mask marks files only by default. The folder button in the row includes folders, and that choice is remembered too. And note that the mask acts once, not continuously — a matching file that appears in the folder later is not marked retroactively. That's on purpose: the marked set decides what F8 deletes, and it shouldn't change without you.
Patterns you don't have to retype
Some patterns you'll want over and over. Under Settings → Patterns you save them under a name — Temporary files for *.tmp;*.temp;*.bak;*~, say.
Five are set up for you already:
In the Cleanup group:
- Temporary files —
*.tmp;*.temp;*.bak;*~ - macOS metadata —
.DS_Store;._*;.Spotlight-V100;.Trashes;.fseventsd
In the Development group:
- Version control —
.git;.svn;.hg - Generated folders —
node_modules;build;dist;target;DerivedData;.build
And one without a group:
- Images —
*.jpg;*.jpeg;*.png;*.heic;*.gif;*.tiff;*.webp
Version control and Generated folders are deliberately two separate entries: when searching you usually want to skip node_modules but keep the repository. A group name sorts an entry into its own submenu; without one it sits below the groups.
Each preset also remembers whether it may match folders, which is why Version controlfinds the .git folder while Temporary files means files only.
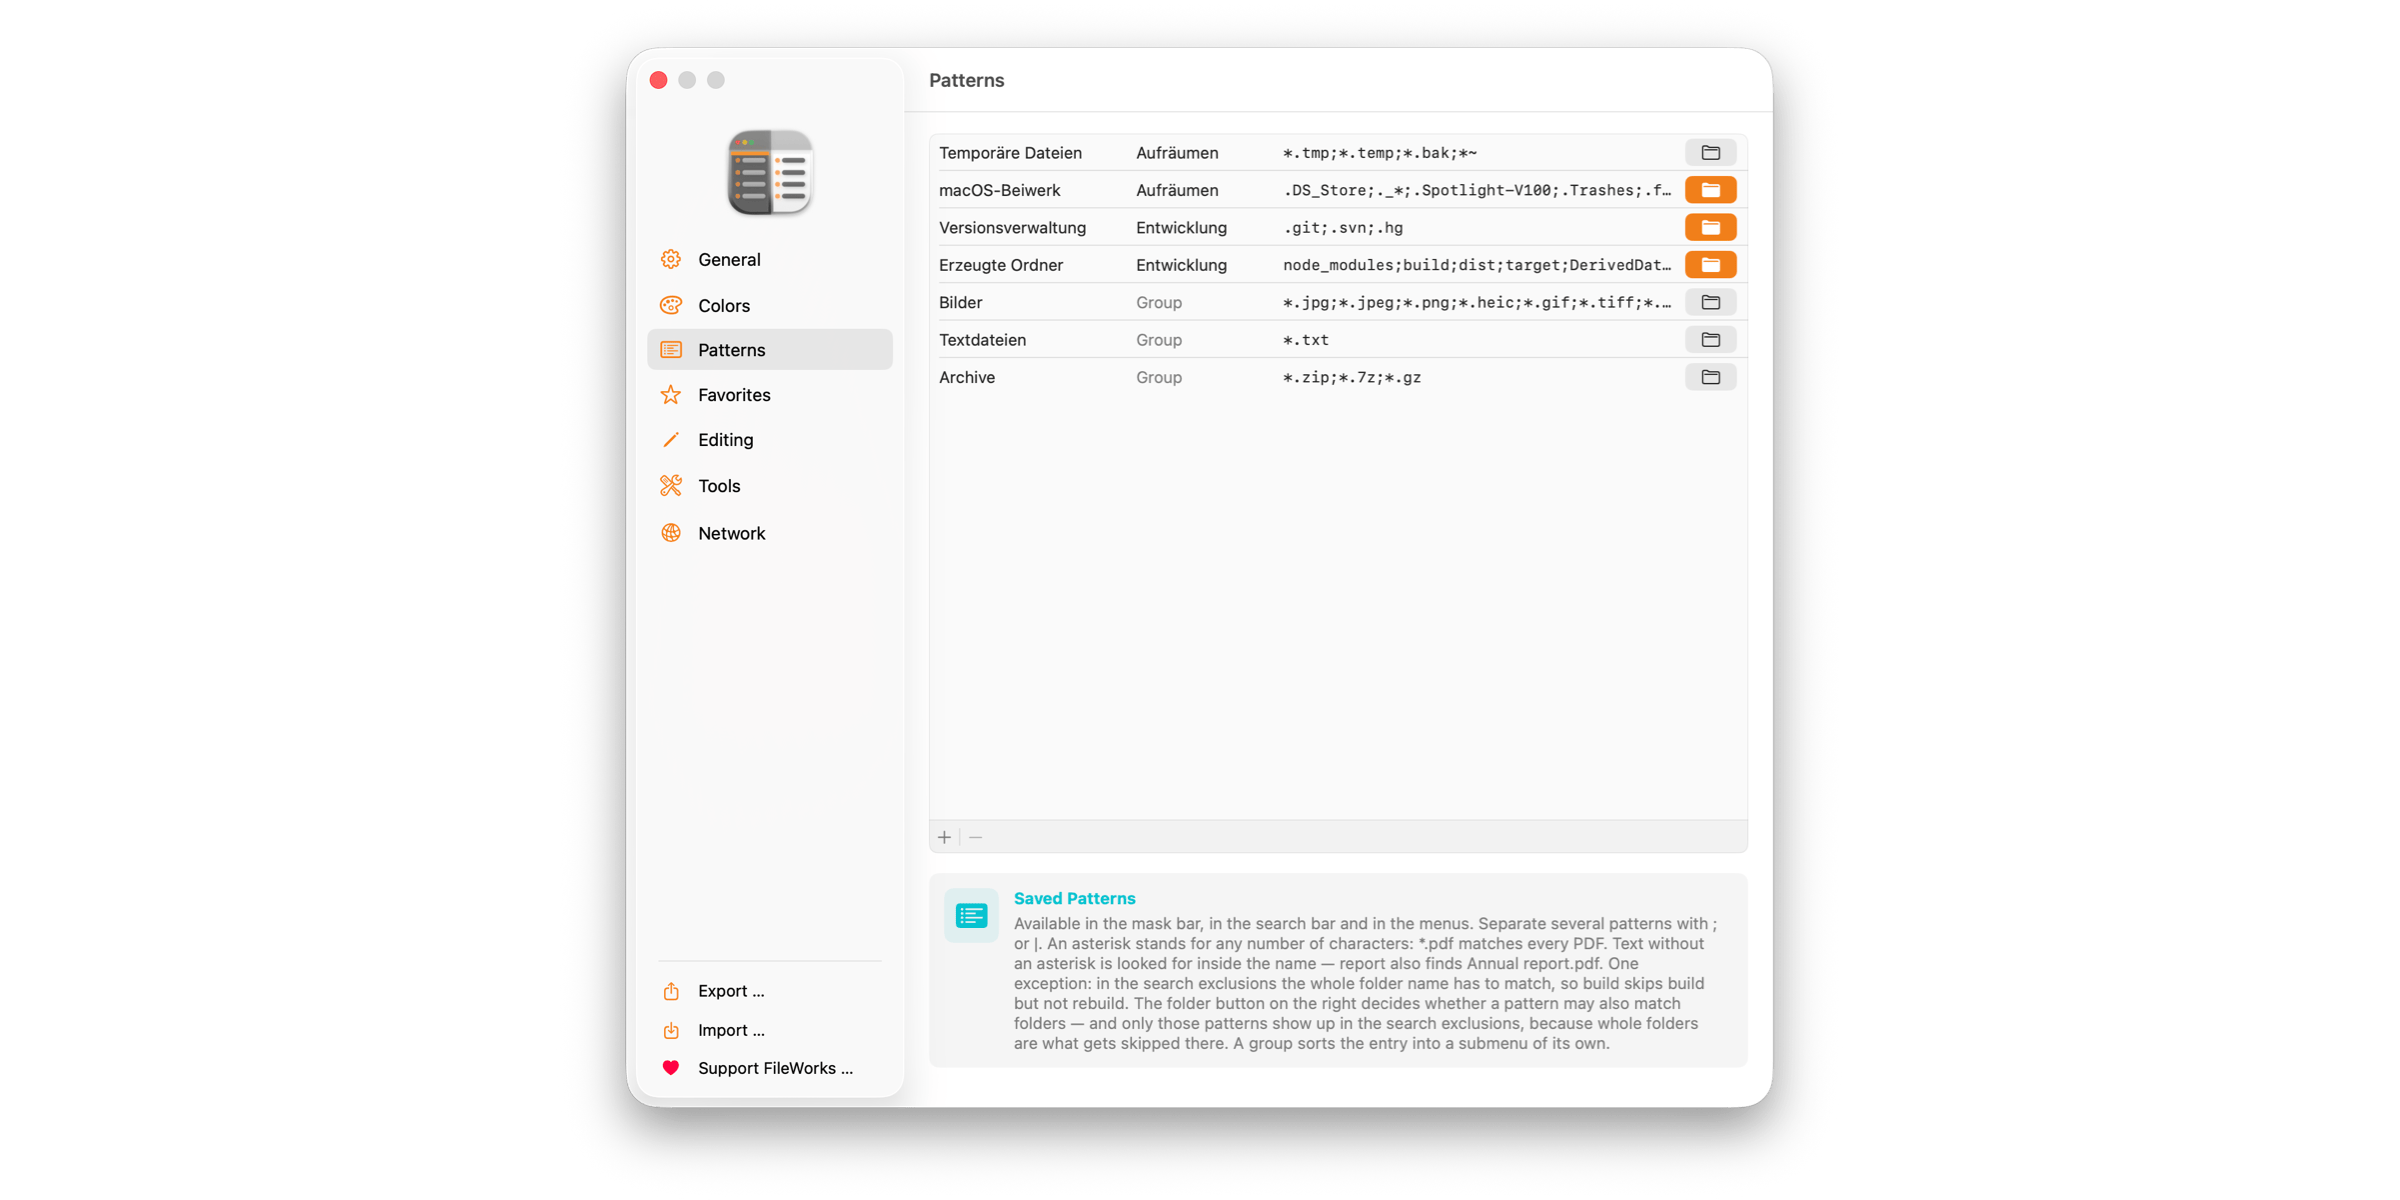 They show up wherever a pattern makes sense — the list button in the mask row, the search bar's pattern and exclusion fields, and as Mark by Pattern / Unmark by Pattern in the context menu and the Actions menu. The context menu offers them even when nothing is selected: a right-click on empty space is enough, since patterns act on marks anyway.
Hold ⌥ to see the alternative
Every one of those entries has a second behaviour, and you don't have to memorise a single one — hold ⌥ and the label tells you what it would do instead.
- In the mask row, a preset normally writes into the field; with ⌥ it applies straight away.
- In the search fields, likewise — write into the field, or search now.
- In the menus, Mark by Pattern normally replaces the marks; with ⌥ it becomes Add Pattern to Marking.
- And Unmark by Pattern, which on empty marks would mark everything but the matches, becomes the strict Subtract Pattern from Marking.
It's a small idea that pays off constantly: the menu explains itself while you're standing in front of it.
Smart Select and Invert
Three more commands in the Actions menu, and — like everything above — they all produce marks, so their result survives a stray click:
Smart Select (⌃ + ⌘ + S) marks every item whose typealready occurs in your working set. Select one .zip and one .md, hit it, and every zip and every md file in the folder joins in. It's the fastest way to go from "one example" to "all of these".
Smart Deselect (⌃ + ⇧ + ⌘ + S) is the counterpart: everything whose type is not in the working set.
Invert Selection (⌃ + ⌘ + I) flips marked and unmarked.
Select None clears both layers in one go.
Putting it together
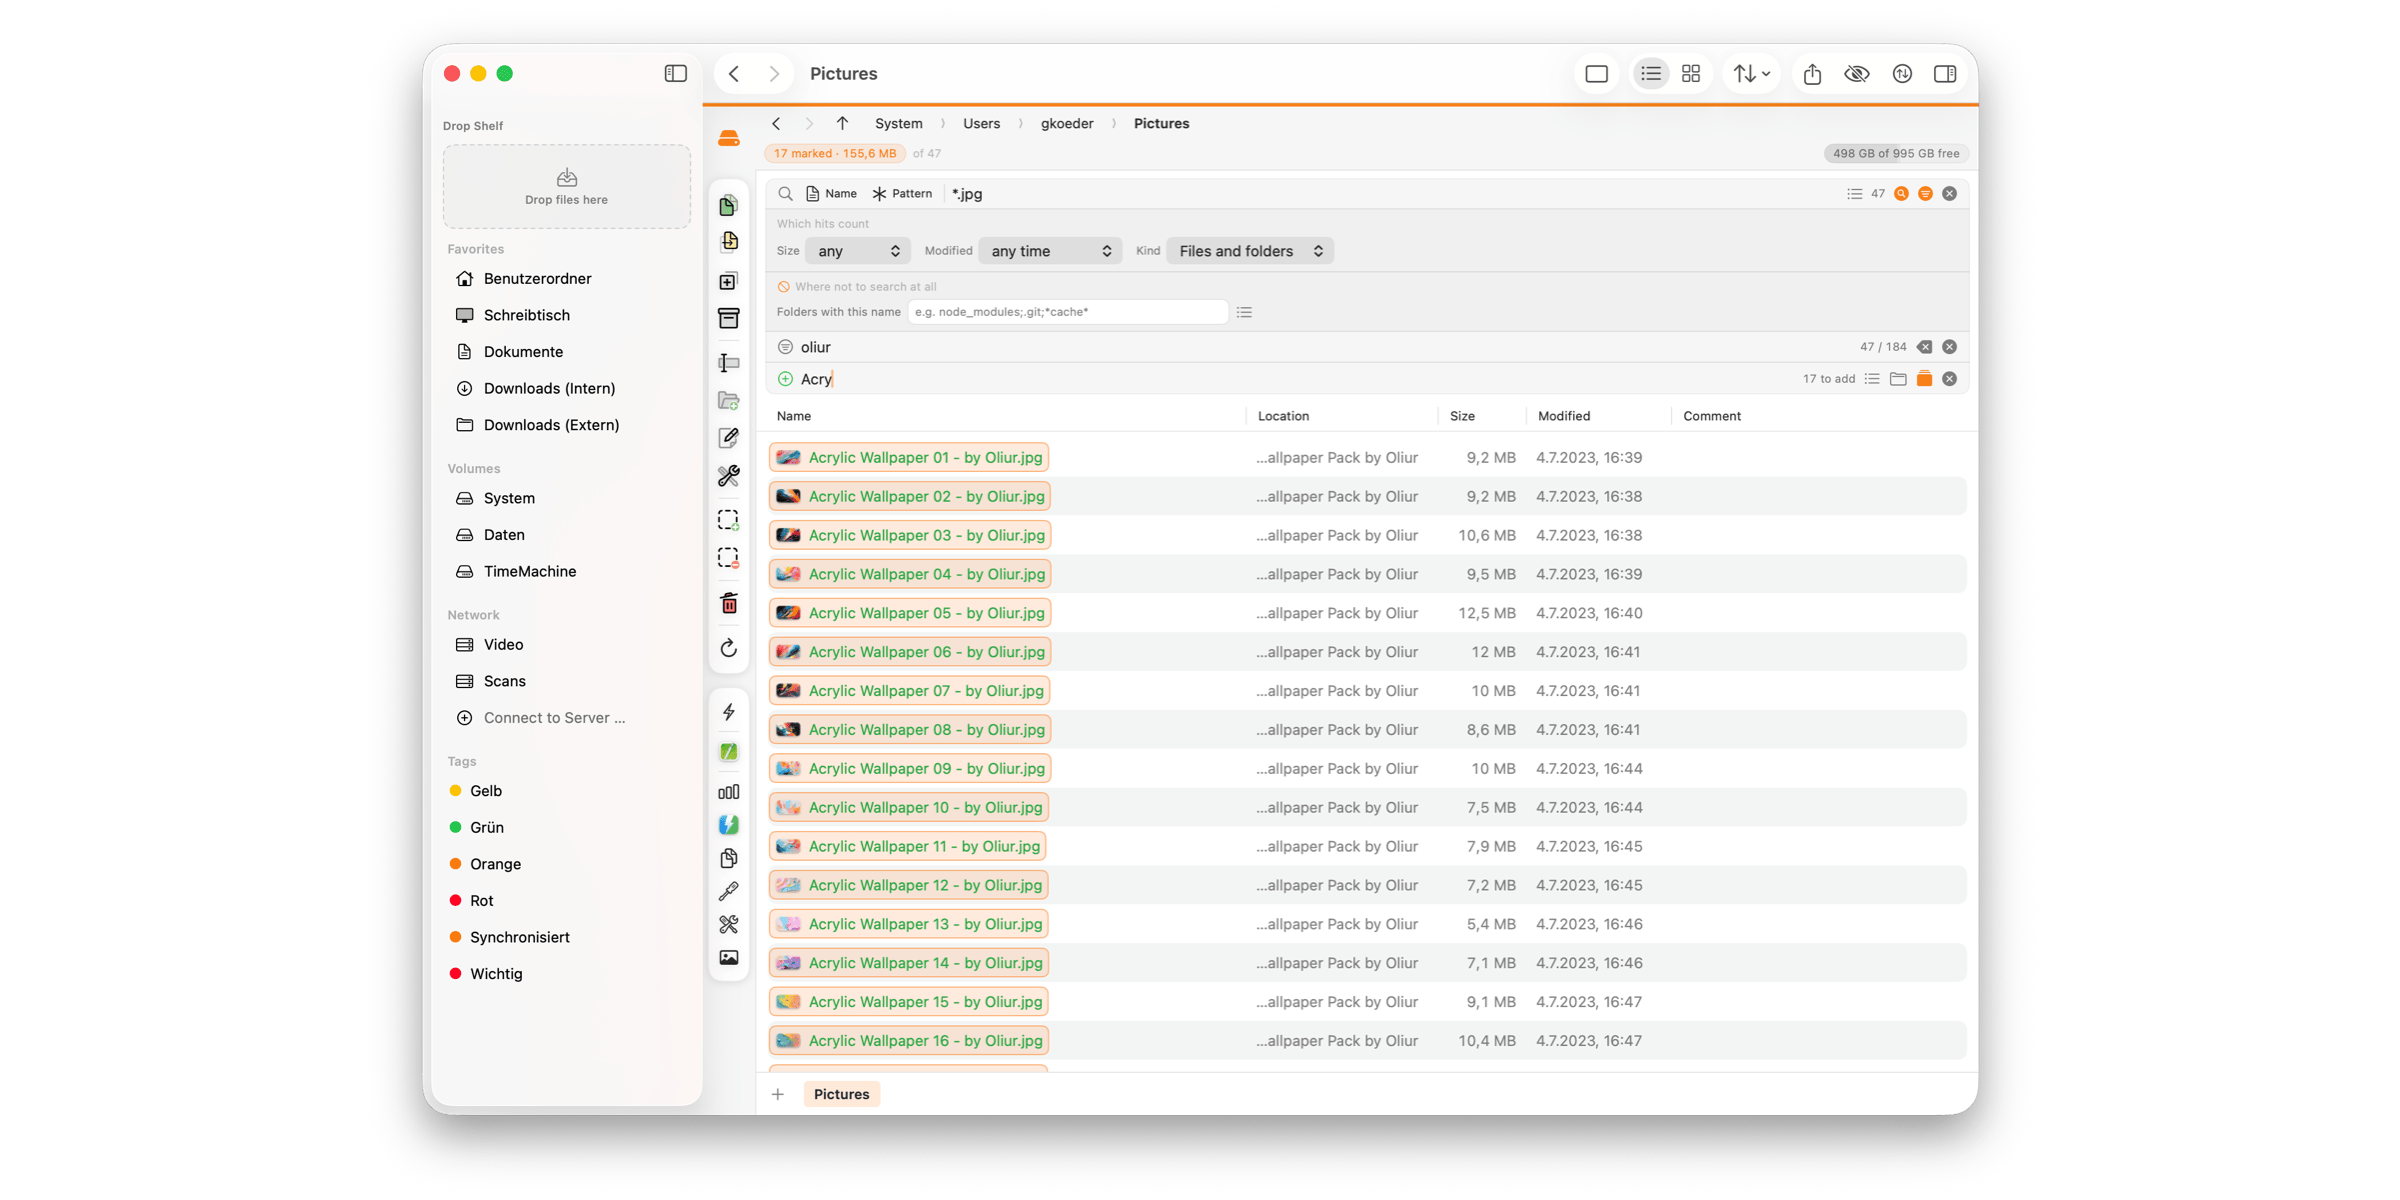
Here's the kind of thing this all adds up to. Say you want every image from a project folder tree, minus the exports, copied to a drive on the right.
- ⌘ + ⇧ + F — search the tree. Drop in the Generated folders preset as an exclusion so
buildanddistnever get scanned. - ⌘ + F — filter the results to the client name.
- ⌘ + S — click the presets button, pick Images, press ↩. The counter tells you how many before you commit.
- Turn on Collect, switch to −, type
*_export*, ↩. The exports drop out. - F5.
Five steps, no scrolling, no hand-picking, and at every point a number on screen telling you exactly how big the set is. That's the whole idea: you should never have to guess what you're about to copy — or delete.
The short version
- Selection is the cursor. Marks are the batch you're building, and they hold.
- ⇧ + Space marks and moves down. Ranges convert to marks in one press.
- Search → Filter → Mark chain together, always in that order.
- The Quick Filter hides; your marks live through it.
- Select by Mask is precise, shows its match count before you commit, and can add, subtract or invert.
- Save the patterns you use often — and hold ⌥ when you're not sure what a menu entry will do.
Start with the marks. Everything else clicks into place from there.