Every one of us has a handful of little rituals. Open these images in that one app. Back up a few files before trying something risky. Make that JSON file readable. Shrink thirty photos for the web. None of it is hard — it's just fiddly, and you do it again and again.
Custom tools are FileWorks' answer to that. You teach it the step once, and from then on it's a button.
And before you start eyeing the exit: you don't need to be a programmer. The simplest tool takes half a minute and doesn't involve a single line of script. If you later feel like letting a little script chew through a whole batch of files — that's the same feature, just further along. Both live in the same place, and you can stop wherever you like.
Let's build a few.
Your first tool, in about a minute
No script. Suppose you always open your images in the same app — Pixelmator, say. Here's your button:
- Open Settings → Tools and click + at the bottom of the list.
- Type → Launch app with selection.
- App → pick Pixelmator (or whatever you use).
- Name → "Open in Pixelmator". Leave it empty and FileWorks just uses the app's name.
- Close the settings.
Done. Mark a few images, open the Tools menu, and they all open in Pixelmator. No $, no quotes, nothing.
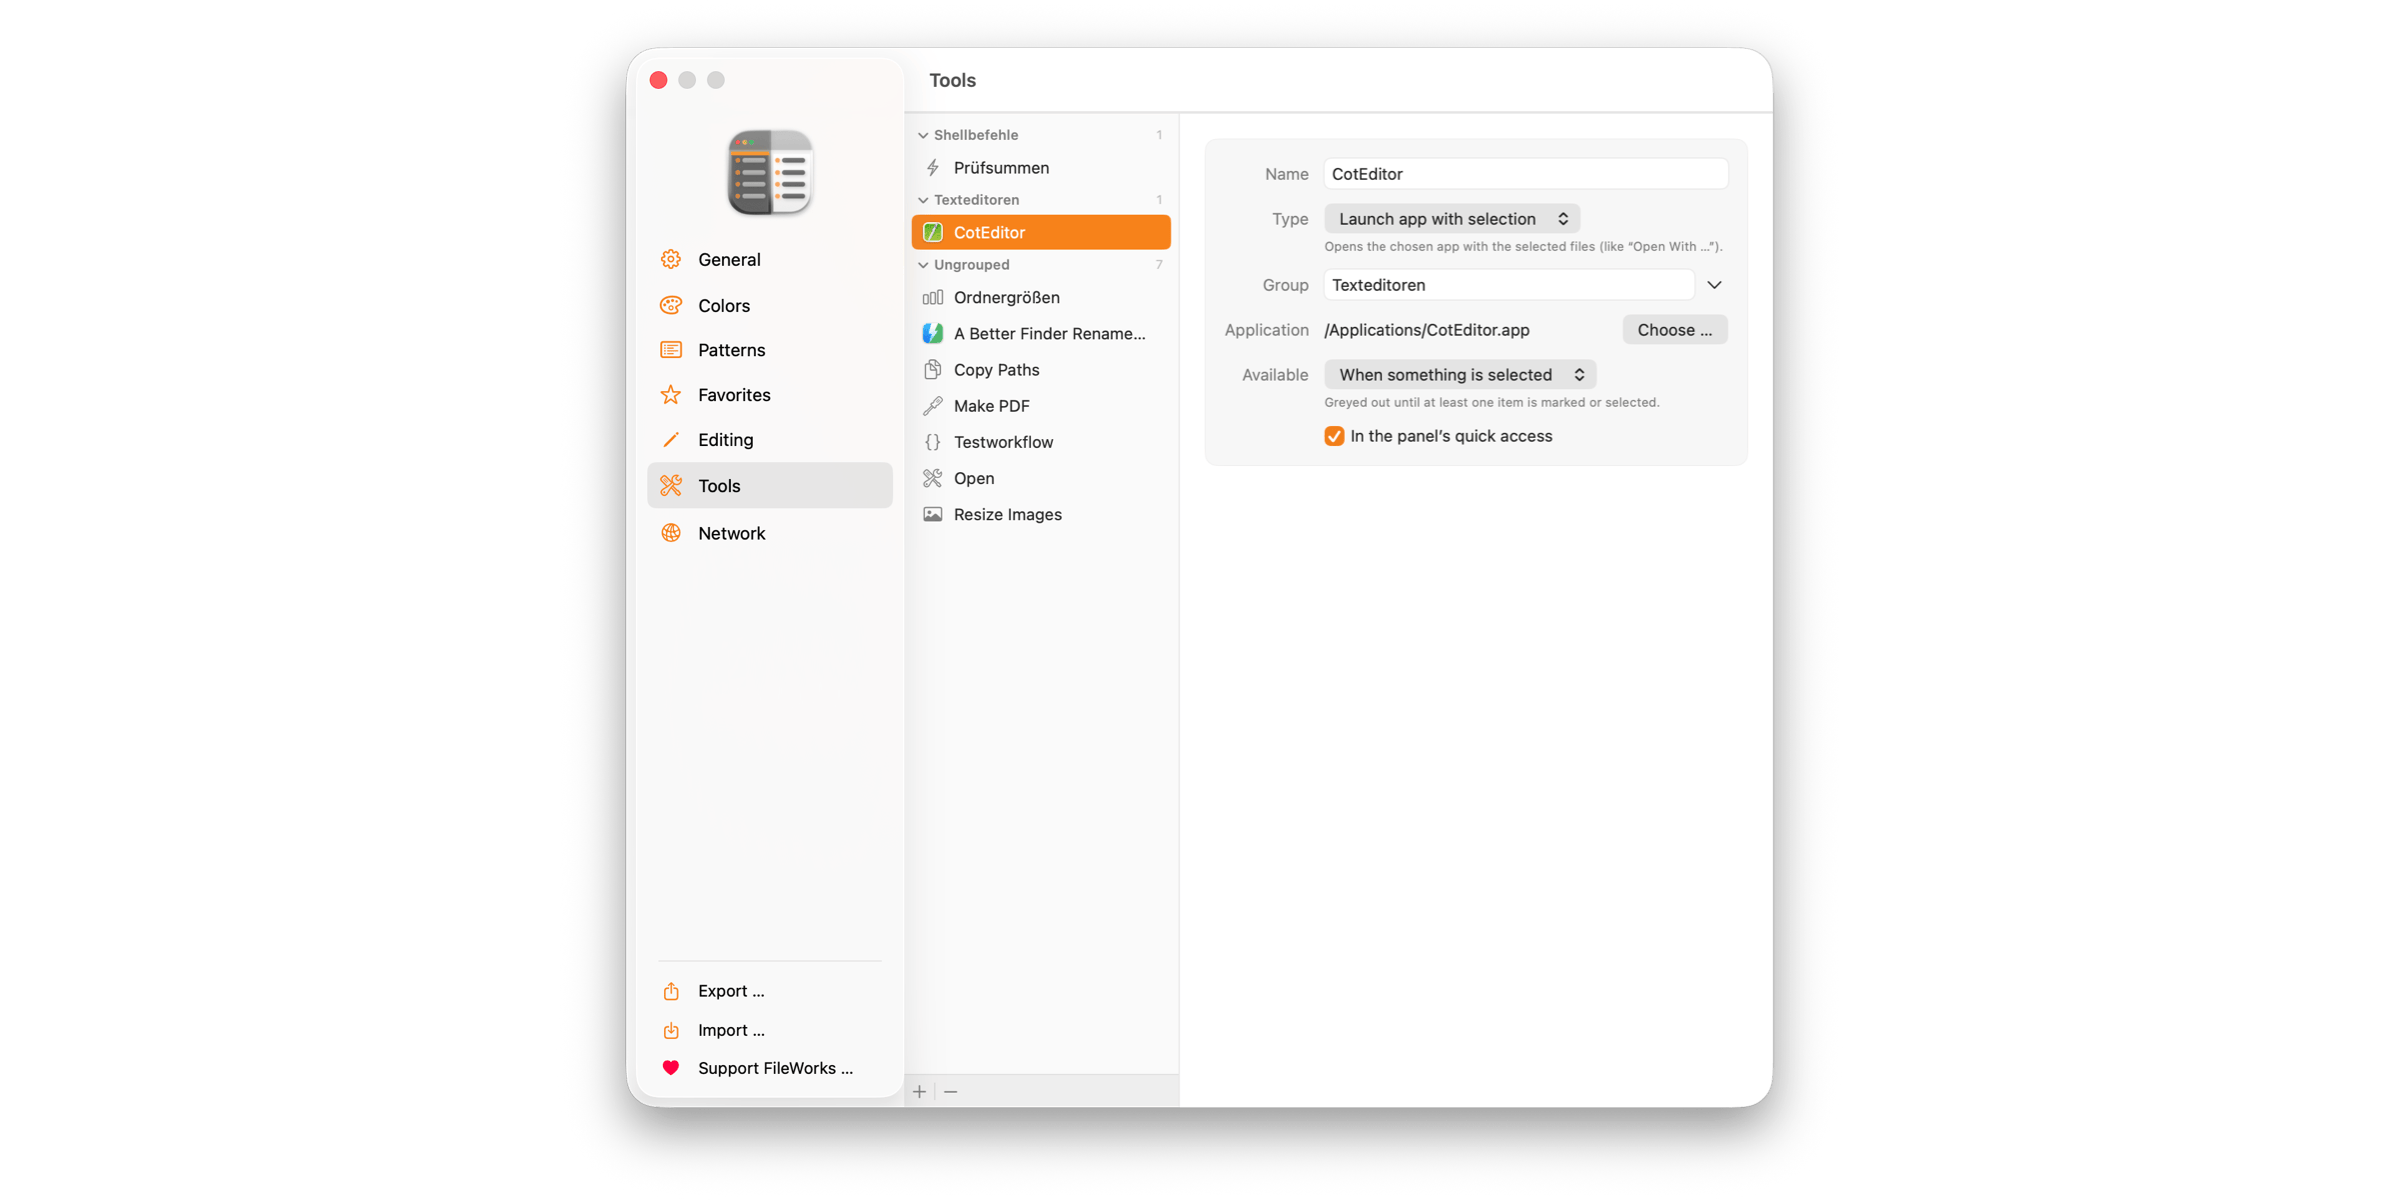 While you're there, one small extra that pays off immediately: set Available to For certain file types and enter
 jpg, png, heic. Now the button is only clickable when images are actually marked, instead of quietly leading you astray.
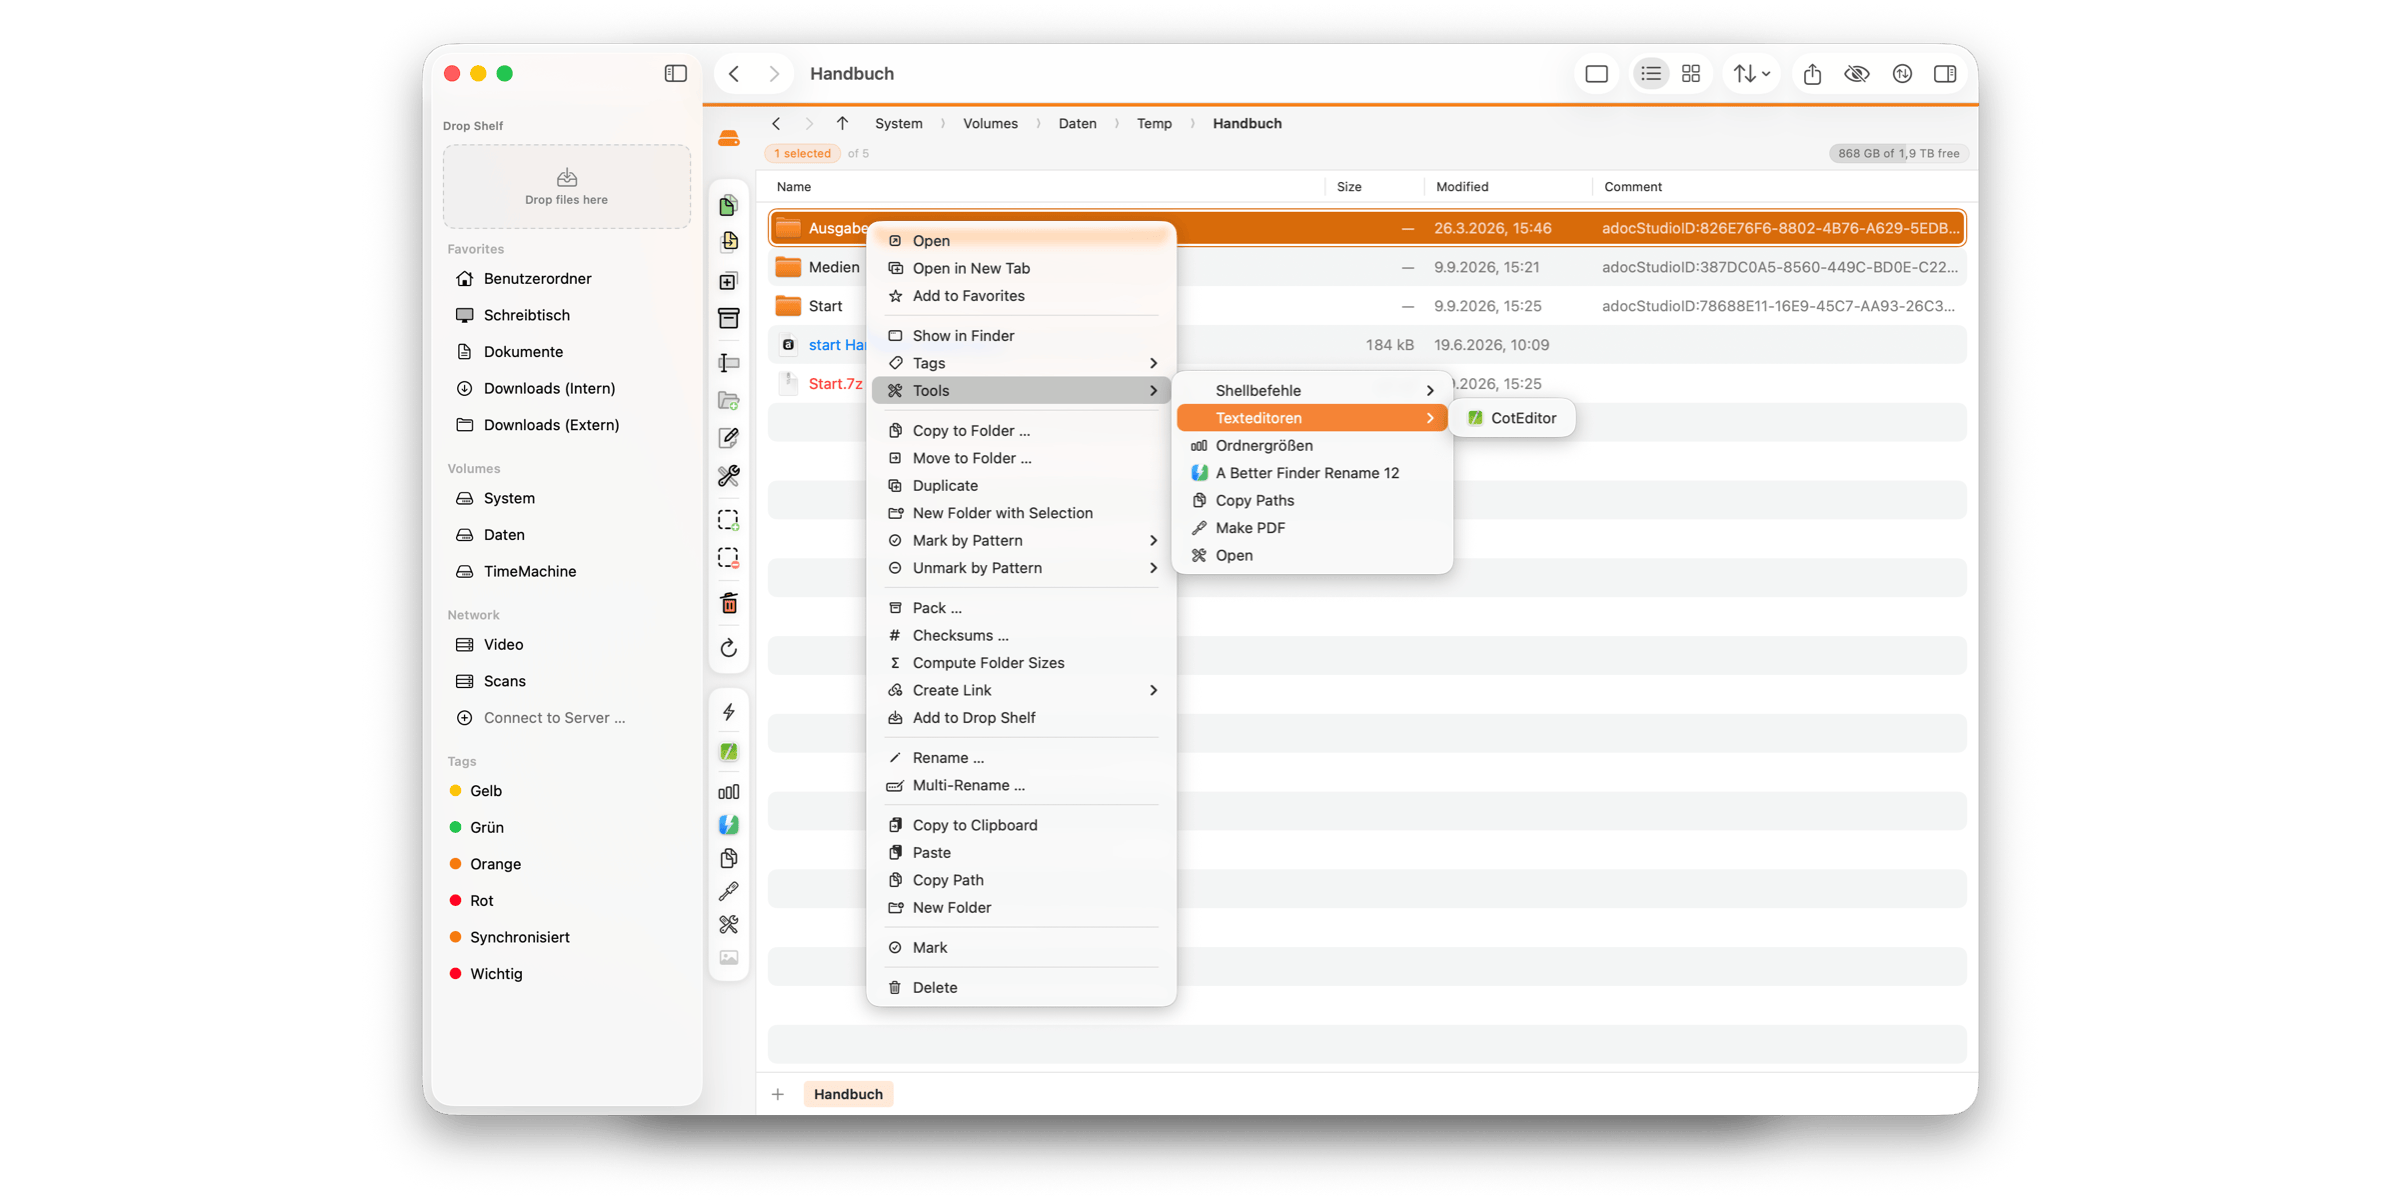
You'll find your tools in three places:
- the Tools menu in the menu bar,
- a file's context menu, under Tools — showing only what fits what you clicked,
- and the action bar beside each panel: the Tools button opens all of them by group, and anything you flag for quick access gets a button of its own below.
Four kinds of tool
Every tool is one of four kinds. Pick the one that fits the job:
Launch app with selection — the one we just built. You choose an app, the tool opens the marked files in it. Nothing else: no arguments, no output. A fixed "Open With …" as a button.
Run program / script — a program or a script of yours runs, and you decide which files and values it gets. This is the one you want as soon as something ready-made (sips, ffmpeg, jq) or your own script should do the work.
Run shell command — for quick one-liners. A single line in zsh, with everything that implies: pipes, &&, redirections. Perfect for trying something out.
Run shortcut — starts a shortcut from the macOS Shortcuts app and hands it the marked files. Ideal if you've already built your automation over there.
If you're just starting, stay with the first kind as long as it does the job. The rest will still be here.
What a tool works on
A tool acts on the files you've marked — the coloured pills. Marked nothing? Then it uses the current selection instead. Throughout the tool editor this is called the working set.
(If marks are new to you, they're the second selection layer FileWorks puts on top of the familiar macOS highlight — the one that survives a stray click. Worth ten minutes if you haven't met them yet.)
Placeholders: telling a tool which files it gets
A tool needs to know what to work on, and that's what placeholders are for — short tokens FileWorks swaps for real values at run time. The important one is {paths}: "the paths of all marked files".
Take wc, which counts lines. Enter this as a shell command:
wc -l {paths}
Mark three text files, run it, and FileWorks builds:
wc -l /path/to/one.txt /path/to/two.txt /path/to/three.txt
You typed {paths}. FileWorks did the rest.
The files
{path}— the path of the first file in the working set.{paths}— the paths of all of them.{name}/{names}— file name of the first file with its extension (holiday.jpg), or the names of all of them.{stem}— the first file's name without the extension (holiday).{ext}— the first file's extension, no dot (jpg).
The folders
{dir}— the folder the active panel is showing.{target}— the folder in the other panel.
And one that asks you
{?Your question}— prompts for a value when the tool runs. More on this below.
You don't have to memorise any of that. The tool editor has a glossary of all of them: click one and it drops in where you last typed, and hovering shows what it'll insert.
Singular or plural? That's the one thing that trips people up, and it's quickly settled: {path} is one file — the first. Use it when your tool handles a single file per run. {paths} is all of them. Use it when your program happily takes a list.
The plural forms become one value per file, not one long string. Mark three files and your program genuinely receives three separate arguments.
Never put a placeholder in quotes yourself. Not even when file names contain spaces, brackets or worse — FileWorks handles that. Write
{path}, not"{path}". There's a good reason, and we'll get to it at the end.
Asking for a value when it runs
Sometimes a tool should work slightly differently each time. Rather than building one tool per variant, let FileWorks ask.
Write a question in curly braces with a question mark, right where the value belongs. Here are arguments for Apple's sips that shrink an image to a maximum edge length of your choosing:
-Z {?Longest edge in pixels} {path} --out {stem}-small.{ext}
Run it, and a field appears labelled exactly that. Type 1200 and the image comes out at 1200 pixels on its longest edge, saved as …-small.jpg next to the original. One tool for everysize.
A few useful details:
- You're asked once per run, not per file. Shrink twenty photos, type the size once.
- The same question is only asked once. Use
{?Suffix}in three places and one field fills all three. - Cancel means cancel. Dismiss the prompt and the tool doesn't run.
- Questions may contain spaces but not a
{. - Keep them short, and name the unit: "Quality (1–100)", "Longest edge in pixels".
Transforming files: input and output
So far our tools have done something with files. It gets genuinely useful when a tool transforms them and the result lands in the right place by itself. That's what the Inputand Output settings are for.
The mental model is simple:
file → program → result
Input decides how the file reaches the program. Normally None — the file arrives as a path, as we've been doing. Or Contents of the selected file, which streams the file's contents straight in, for programs that read a stream and don't want a file name.
Output decides what happens to what comes back:
- Discard — thrown away. For tools that do their own thing: write a file, post a notification.
- Show in a window — the result opens in a console window. Perfect while experimenting.
- Write to a new file — becomes a new file, named from a template like
{stem}.sorted.{ext}. If the name is taken it becomes "name 2", "name 3" — a new file never overwrites an existing one. - Replace the source file — the result replaces the file it came from. The one mode that overwrites on purpose.
- Copy to the clipboard — straight to the clipboard, ready to paste.
Two examples make it click.
Make JSON readable. JSON files are often one endless line; jq formats them. Type: Run program / script, Program jq, Arguments ., Input Contents of the selected file, Output Replace the source file. Mark a .json file, click, done.
Make a sorted copy. Same idea with sort, but Output → Write to a new file with {stem}.sorted.{ext}. You get a sorted copy beside the original, and the original is untouched.
A word on "Replace the source file" — it's safer here than doing it by hand.
On the command line, the obvious version of this destroys your file:
sort < notes.txt > notes.txtThe shell truncates
notes.txtbeforesortever gets to read it. Classic, painful, and everyone learns it the hard way once.FileWorks never does that. The result is collected in full in a hidden file and only moved into place once the program has finished cleanly. Something goes wrong, or you cancel? Your original is exactly as it was.
Bringing your own scripts
When a job outgrows a one-liner, write it as a small script — zsh, Python, whatever you're comfortable in — and add it as a Run program / script tool.
Two things are non-negotiable, and forgetting either is the usual reason nothing seems to happen:
-
The first line names the interpreter. A shebang:
#!/bin/zsh, or#!/usr/bin/env python3. -
The script must be executable. Once, in a terminal:
chmod +x ~/bin/my-tool.sh(Right-click in a panel → Open Terminal here puts you in the right folder.)
Miss either and FileWorks reports an error in the panel's status bar instead of a result.
A few more things that make scripts behave predictably:
- Files arrive as a proper list. No quoting on your part.
{paths}becomes one value per file —"$@"in the shell,sys.argv[1:]in Python. - The script starts in the panel's folder. Relative paths refer to it, and files written relatively appear right there where you can see them.
- Once for all, or once per file? With once with all, the whole working set goes into a single run and you write the loop. With once per item, FileWorks calls your tool per file — you write for a single
{path}and let FileWorks do the repeating. That mode also gives you a progress bar with a cancel button, and one bad file doesn't take the whole batch down. - Success means "exited cleanly". Whether an output file gets written depends on exit code 0. In a shell script,
set -emakes it stop at the first error.
A small shell script
This one drops a timestamped backup of every marked file into a Backups subfolder — handy right before you try something risky. Save as ~/bin/fw-backup.sh:
#!/bin/zsh
# Copies each passed file into a "Backups" subfolder, timestamped.
set -e
dest="Backups"                       # relative to the working directory
mkdir -p "$dest"
stamp=$(date +%Y%m%d-%H%M%S)
for f in "$@"; do                    # "$@" are the {paths} arguments
    cp -R "$f" "$dest/${stamp}_$(basename "$f")"
done
osascript -e "display notification \"$# item(s) backed up\" with title \"FileWorks\""
Then: chmod +x ~/bin/fw-backup.sh, add a tool of type Run program / script, Program = the script, Arguments = {paths}, Working directory = active panel, Run = once with all. Mark some files and click. The notification is the visible result here, since the script prints nothing itself.
The same idea in Python
This one writes a manifest.csv listing the marked files with sizes and dates. Save as ~/bin/fw-manifest.py:
#!/usr/bin/env python3
# Writes a CSV overview of the passed files into the working directory.
import sys, os, csv, datetime

paths = sys.argv[1:]                  # the {paths} arguments
with open("manifest.csv", "w", newline="") as out:
    writer = csv.writer(out)
    writer.writerow(["Name", "Bytes", "Modified"])
    for p in paths:
        info = os.stat(p)
        when = datetime.datetime.fromtimestamp(info.st_mtime).isoformat(timespec="seconds")
        writer.writerow([os.path.basename(p), info.st_size, when])
Set it up the same way. When it runs, manifest.csv simply appears in the list — the file isthe result.
The pattern fits almost anything scriptable: converting images with sips, editing PDFs, gitcommands, uploads. Reach for {dir} or {target} when a tool should act on a folder rather than the marked files, and once per item when a program only ever takes one file at a time.
Three recipes to copy
Everything not mentioned stays at its default.
Pretty-print JSON, in place
Type        Run program / script
Program     /opt/homebrew/bin/jq
Arguments   .
Input       Contents of the selected file
Output      Replace the source file
Run         Once per item
Available   For certain file types — json
Icon        curlybraces
Mark any number of .json files and click once. The type filter keeps the button greyed out unless JSON is selected, "once per item" gives you a progress bar, and a broken file is skipped with an error while the rest go through.
Shrink images to a size you pick
Type        Run program / script
Program     /usr/bin/sips
Arguments   -Z {?Longest edge in pixels} {path} --out {stem}-small.{ext}
Run         Once per item
Available   For certain file types — jpg, jpeg, png, heic
Icon        photo
Mark thirty photos, run, type the size once, get thirty -small copies. Different size next time? Run it again and type something else — nothing to reconfigure.
Copy the paths of everything marked
Type        Run shell command
Command     printf '%s\n' {paths}
Output      Copy to the clipboard
Available   When something is selected
Icon        doc.on.doc
Mark, click, paste. One path per line. No script, no extra program.
A few more ideas
- Fix Windows line endings —
trwith-d '\r', input from selection, output "Replace the source file". - Checksums for a release — shell:
shasum -a 256 {paths} > SHA256SUMS. - What's eating space here? — shell:
du -sh {dir}/* | sort -h, output "Show in a window", Available "Always". - Move marked files to the other panel — shell:
mv {paths} {target}.
When a tool is available
A tool meant for images shouldn't look clickable while a text file is marked. Availablesettles that:
- Always — regardless of what's marked. Right for tools that work on a folder (
{dir},{target}) or need no file at all: "git status here", "show disk usage". - When something is selected — greyed out until at least one file is marked. Right for anything mentioning
{path}or{paths}. - For certain file types — active only when every marked file carries one of the extensions you list.
The extension list is relaxed about format: jpg, png, heic, .JPG;PNG and jpg png all work. Commas, semicolons or spaces separate; the dot is optional; case doesn't matter.
That word every is deliberate. Mark twelve JPEGs and one notes.txt, and an image tool stays greyed out — because if it ran anyway it would also process the text file, and a tool that replaces its source would destroy it. Fixing the selection first is the cheaper mistake.
If a button is greyed out, hover it and it tells you why: "Shrink images — only for: jpg, png", or "select at least one file".
The context menu applies the same filter more strictly: what doesn't fit isn't shown at all. Right-click a PDF and you see only tools that can do something with a PDF. In the action bar the buttons stay put and merely grey out, so they don't jump around every time you change the selection.
Two things override everything: inside an archive all tools are greyed out (an archive entry isn't a file a program can open — copy it out with F5 first), and if the program has gone missing, the tool greys out and shows up red in the settings list.
While it runs
Any tool that waits for its program — anything except Output → Discard — appears at the bottom of the window, in the same queue as copy and move jobs:
- A progress card with the tool's name. With "once per item" it counts files and names the one it's on.
- A Cancel button that stops the tool and everything it started — the same reach as Ctrl + C in a terminal.
- A result: "Done", "Cancelled" or "Done, N errors".
If something went wrong, a Details … button appears with the full output: the program's message, the exit code, and — with "once per item" — which file caused it.
A cancelled run is not an error, and FileWorks says so — it knows the cancel came from you. And if a tool produces endless output, it's truncated at 1 MiB with a note, rather than eating your memory.
If you already use the Shortcuts app
Built your workflows in macOS Shortcuts already? Don't rebuild them. A tool of type Run shortcut starts an existing shortcut and passes it the marked files.
Create the tool, pick Run shortcut, open the list in the Shortcut field and choose one. If your Shortcuts library uses folders, they appear as submenus. The circular-arrow button next to the list re-reads it — handy when you've just built a new shortcut while FileWorks was running.
Run works as everywhere else: all files at once, or once per file. Which is right depends on the shortcut — one that merges images into a single PDF wants them together; one that shrinks an image works better individually.
Output has just two choices here:
- Discard (run in background) — the normal case. FileWorks starts it and moves on.
- Show in a window — FileWorks waits and shows what the shortcut reported. This is the setting to use while you're getting it working: in background mode, errors are invisible.
The shortcut has to accept files. FileWorks always passes files. A shortcut built for text ("speak the given text") receives a file and can't do anything with it. In the Shortcuts app, Shortcut Details tells you what it expects — "Files" or "Images" and you're fine.
The file-writing outputs are deliberately missing here: a shortcut doesn't return its result that way, and all you'd get is an empty file.
One nice touch: rename a shortcut later and your tool keeps working. FileWorks remembers the internal identifier, not the name, and picks up the new label next time it reads the list. Only deleting the shortcut makes the editor complain, in red.
Keeping order once you have a few
Ten tools are manageable. Thirty aren't, so you can sort them into groups — "Image editing", "Development", whatever suits you.
Creating a group is just assigning one: select a tool, type a name into the Group field, press ↩. It exists now. For the next tool you don't retype it — the little arrow beside the field offers everything you've used.
Tools without a group are perfectly fine; they gather under Ungrouped at the bottom.
In the list you can collapse and expand a group by clicking its name, drag a tool onto another row to slot it in, drag it onto a group name to append it there, and drag a whole group onto another to reorder them.
That order isn't decoration. It's also the order of the buttons in the action bar and the entries in the menus, so put what you use daily at the top.
In the menu bar and context menu each group becomes a submenu, with ungrouped tools below them — groups first, much like folders before files in a file list. The context menu adds one more check: if not a single tool in a group suits the file you clicked, the group is left out entirely. You'll never open an empty submenu.
The action bar shows groups in two places: the Tools button's menu turns each into a submenu, and in the quick access below it a divider separates one group from the next. Which tools reach that quick access is your call per tool, via In the panel's quick access — the button's menu holds all of them regardless.
 ## For the curious: why file names never become commands
This part is optional. For everyday use one rule covers it — never quote placeholders yourself — but if you'd like to know why that's safe, here it is.
File names come from the file system, not from you. And a file may perfectly legally be called $(rm -rf ~).txt. If FileWorks simply pasted that name into your shell command as text, clicking a tool could ruin your afternoon.
So it doesn't. A placeholder is never pasted as text. Each one is replaced by a reference to a shell parameter — "$1", "$2", … — and the actual values are handed to the shell separately, as arguments. The shell substitutes them and then never looks at the result again for $(…), backticks and friends. A value stays a value. Your command — pipes, &&, loops, redirections — stays exactly what you wrote.
All of these do precisely what they look like, safely:
wc -l {paths}
grep -c foo "{path}"
echo '{name}'
Which is exactly why you don't quote them yourself: FileWorks already did.
One caveat worth knowing. FileWorks makes the shell safe. Drop a value into the source of another language — a Python snippet inside a here-document, say — and a name containing a quote can throw that language off. FileWorks can't sanitise code you assemble yourself.
The fix is the same idea one level down: let the other language receive the value, rather than writing it into its own source.
python3 - "$1" <<'EOF'      # note the QUOTED <<'EOF' and the "$1" argument
import sys
print(sys.argv[1])          # the path arrives as a value, never as code
EOF
Every placeholder is available as "$1", "$2", … in the order it appears. Even easier, the common single values are also environment variables, readable from any language:
FW_PATH,FW_NAME,FW_STEM,FW_EXT— path, name, name without extension and extension of the first marked file.FW_DIR,FW_TARGET— the folder of the active and of the other panel.FW_COUNT— how many files are marked.
So os.environ["FW_PATH"] in Python, "$FW_DIR" in the shell. (Lists like "all paths" are deliberately not available as variables: a file name can itself contain a newline, so newlines can't reliably separate them. That's what {paths} is for.)
And the limit. A command that deliberately re-interprets its arguments turns a value back into code — eval "$1", zsh -c "$1", xargs sh -c '…'. That's the tool author's responsibility, and it's the price of having a free shell mode at all. Use placeholders as values and you're on the safe side.
Take them with you
Once you've built a set of tools you like, they don't have to stay on one Mac. Settings → Export … writes everything to a JSON file — colour rules, patterns, favourites, editors, tools, servers, key assignments — and Import … reads it back. It's the fastest way to set up a second machine.
The file is also well behaved in version control: keys are sorted, no timestamp is written, and two exports of the same state are byte-for-byte identical. Commit it and you'll see real changes only.
The short version
- The simplest tool is an app plus a file type, and takes a minute.
- Tools act on your marks, falling back to the selection.
{path}is one file,{paths}is all of them — and you never quote either.{?Question}turns one tool into every variant of itself.- Input and Output turn a tool into a transformer; "replace the source file" is safer here than on the command line.
- Set Available honestly and your buttons stop lying to you.
- Groups decide menu order; drag the daily ones to the top.
- Already have Shortcuts? Use them as they are.
Start with one. Pick the thing you did three times this week and make it a button — that's usually the right first tool.